Difference between revisions of "Amahi 11 Install"
| Line 1: | Line 1: | ||
__TOC__ | __TOC__ | ||
| + | <br> | ||
| + | <big>Welcome to Amahi 11!</big> | ||
| + | These instructions below will guide you through the Amahi 11 Express CD installation, step by step, with screenshots. This is the recommended method for quick download and fast setup. | ||
| + | |||
| + | Should the Amahi 11 Express CD not work for you, there are two alternate install methods for Fedora and Amahi 11: [[Fedora_27_Server_CD_Install|Minimal CD]], so-called Netinstall or [[Fedora_27_Server_DVD_Install|Full (DVD) install]] (provides additional hardware support). | ||
| + | <br> | ||
'''NOTES:''' | '''NOTES:''' | ||
| Line 7: | Line 13: | ||
* 32-bit installs '''are not''' available nor supported in Amahi 11. | * 32-bit installs '''are not''' available nor supported in Amahi 11. | ||
* '''NOT ALL''' apps in previous Amahi versions are available for Amahi 11. Check the [https://www.amahi.org/apps App Store] before proceeding. | * '''NOT ALL''' apps in previous Amahi versions are available for Amahi 11. Check the [https://www.amahi.org/apps App Store] before proceeding. | ||
| − | + | <br> | |
| − | |||
| − | |||
For assistance, visit the [https://forums.amahi.org Amahi Forums] or live support on the [http://talk.amahi.org Amahi IRC channel]. | For assistance, visit the [https://forums.amahi.org Amahi Forums] or live support on the [http://talk.amahi.org Amahi IRC channel]. | ||
| − | = | + | = Prerequisites = |
| − | + | You need to obtain an install code (denoted YOUR-INSTALL-CODE below) from the [https://www.amahi.org/users Amahi control panel] after configuring a profile for the system you are installing, with '''proper network configuration''' for your network. | |
| − | + | Express CD is preconfigured as follows: | |
| + | * '''LOCALIZATION:''' | ||
| + | ** '''KEYBOARD:''' defaults to ''English (US)''. | ||
| + | ** '''LANGUAGE:''' defaults to ''English''. | ||
| + | ** '''TIME AND DATE:''' defaults to server time zone. | ||
| + | * '''SOFTWARE:''' ''Minimal Install'' and should not be changed. | ||
| + | * '''INSTALLATION DESTINATION:''' defaults to the first hard drive in a multi-drive system. | ||
| + | * '''NETWORK & HOST NAME:''' detected automatically. | ||
| + | * '''USER SETTINGS''': user ''admin'' is preconfigured with a password of ''administrator''. | ||
| − | * Fedora 27 Server | + | = Download = |
| − | ** | + | * Amahi 11 Express CD (based on Fedora 27 Server) for 64 bit (577MB) |
| − | ** | + | ** Torrent - [http://dl.amahi.org/isos/Amahi-11-x86_64.torrent Amahi-11-x86_64.torrent] <code>(MD5 e32fb303d6488e98078042dc2d162d08)</code> |
| + | ** Direct Download - [http://dl.amahi.org/isos/Amahi-11-x86_64.iso Amahi-11-x86_64.iso] <code>(SHA1 cf972ec23f0c6b873884b80b4010b9b2b03be14a)</code> | ||
| − | * Burn the ISO to CD/DVD (or [[USB Install|USB]]), insert the media into your server, and | + | * Burn the ISO to CD/DVD (or [[USB Install|USB]]), insert the media into your server, and boot the system. |
| − | * | + | * The instructions below have screen shots and commentary. If you are not an advanced Linux user and know what you are doing, recommend you '''DO NOT''' deviate from the guidance. Click '''[<Screenshot>]''' to show/hide the image. |
==Boot Screen== | ==Boot Screen== | ||
<ul> | <ul> | ||
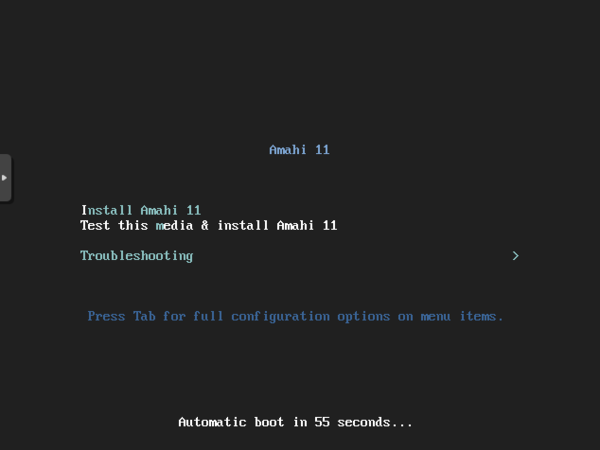
| − | <li>Select ''Install | + | <li>Select ''Install Amahi 11'' |
| − | <div class="mw-collapsible mw-collapsed" data-collapsetext="{{int:Screenshot}}" | + | <div class="mw-collapsible mw-collapsed" data-collapsetext="{{int:Screenshot}}" style="width:400px"> |
| − | [[file: | + | [[file:A11E-SS0.PNG|600px]] |
</div><br></li> | </div><br></li> | ||
</ul> | </ul> | ||
| Line 36: | Line 49: | ||
<ul> | <ul> | ||
<li>Choose desired language and select ''Continue'' | <li>Choose desired language and select ''Continue'' | ||
| − | <div class="mw-collapsible mw-collapsed" data-collapsetext="{{int:Screenshot}}" | + | <div class="mw-collapsible mw-collapsed" data-collapsetext="{{int:Screenshot}}" style="width:400px"> |
| − | [[file: | + | [[file:A11E-SS1.PNG|600px]] |
</div><br></li> | </div><br></li> | ||
</ul> | </ul> | ||
| Line 43: | Line 56: | ||
==Installation Summary== | ==Installation Summary== | ||
<ul> | <ul> | ||
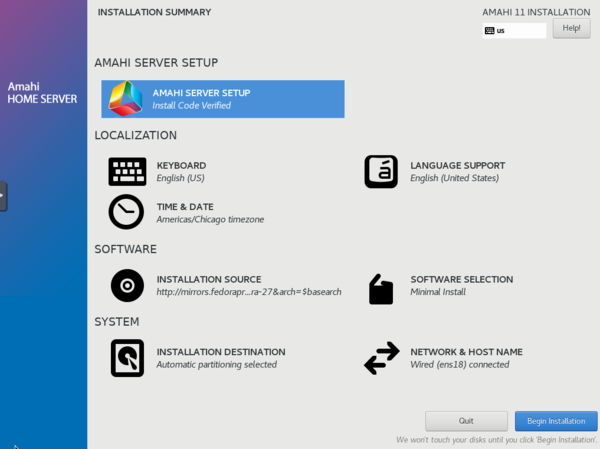
| − | <li>The '''INSTALLATION SUMMARY''' screen will appear. It may take a few minutes to finish '' | + | <li>The '''INSTALLATION SUMMARY''' screen will appear. It may take a few minutes to finish ''Downloading package metadata'' |
| − | <div class="mw-collapsible mw-collapsed" data-collapsetext="{{int:Screenshot}}" style="width:400px"> | + | <div class="mw-collapsible mw-collapsed" data-collapsetext="{{int:Screenshot}}" style="width:400px"> |
| − | [[file: | + | [[file:A11E-SS3.PNG|600px]] |
| + | </div><br> | ||
| + | <li>Choose '''AMAHI SERVER SETUP''' and enter YOUR-INSTALL-CODE obtained earlier followed by '''Done'''. | ||
| + | <div class="mw-collapsible mw-collapsed" data-collapsetext="{{int:Screenshot}}" style="width:400px"> | ||
| + | [[file:A11E-SS6.PNG|600px]] | ||
</div><br></li> | </div><br></li> | ||
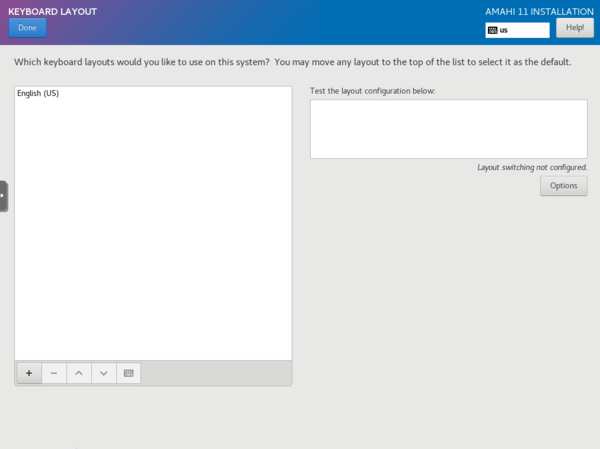
| − | + | <li>Select '''KEYBOARD''' and choose the default layout followed by '''Done'''. | |
| − | <li> | + | <div class="mw-collapsible mw-collapsed" data-collapsetext="{{int:Screenshot}}" style="width:400px"> |
| − | + | [[file:A11E-SS4.PNG|600px]] | |
| − | |||
| − | |||
| − | <div class="mw-collapsible mw-collapsed" data-collapsetext="{{int:Screenshot}}" | ||
| − | [[file: | ||
</div><br></li> | </div><br></li> | ||
| − | |||
| − | |||
| − | |||
| − | |||
| − | |||
<ul> | <ul> | ||
| − | <li> | + | <li>If your keyboard layout is not listed, select the plus sign (+) and add the desired layout. |
| − | <div class="mw-collapsible mw-collapsed" data-collapsetext="{{int:Screenshot}}" | + | <div class="mw-collapsible mw-collapsed" data-collapsetext="{{int:Screenshot}}" style="width:400px"> |
| − | [[file: | + | [[file:A11E-SS5.PNG|600px]] |
</div><br></li> | </div><br></li> | ||
| − | + | <li>Choose the desired layout followed by '''Done'''.</li> | |
| − | <li> | + | </ul> |
| + | <li>Verify:</li> | ||
<ul> | <ul> | ||
| − | <li> | + | <li>'''TIME & DATE''' and change to match your locale if needed.</li> |
| − | + | <li>'''INSTALLATION DESTINATION''' indicates the correct hard drive if you have more than one connected.</li> | |
| − | + | <li>'''NETWORK & HOST NAME''' indicates ''connected''. Don't make any changes unless you are sure of what you are doing.</li> | |
| − | |||
| − | |||
| − | |||
| − | |||
| − | |||
| − | |||
| − | |||
| − | |||
| − | |||
| − | <li> | ||
| − | |||
| − | |||
| − | |||
| − | |||
| − | |||
| − | |||
| − | |||
| − | |||
| − | |||
| − | |||
| − | |||
| − | |||
| − | <li> | ||
| − | |||
| − | |||
| − | |||
</ul> | </ul> | ||
| − | |||
| − | |||
| − | |||
| − | |||
| − | |||
| − | |||
| − | |||
| − | |||
| − | |||
| − | |||
| − | |||
| − | |||
</ul> | </ul> | ||
| Line 115: | Line 86: | ||
<ul> | <ul> | ||
<li>Back to the '''INSTALLATION SUMMARY''' and ready to begin installation. Select ''Begin Installation'' | <li>Back to the '''INSTALLATION SUMMARY''' and ready to begin installation. Select ''Begin Installation'' | ||
| − | <div class="mw-collapsible mw-collapsed" data-collapsetext="{{int:Screenshot}}" | + | <div class="mw-collapsible mw-collapsed" data-collapsetext="{{int:Screenshot}}" style="width:400px"> |
| − | [[file: | + | [[file:A11E-SS7.PNG|600px]] |
</div><br></li> | </div><br></li> | ||
</ul> | </ul> | ||
| − | == | + | ==Installation Progress== |
<ul> | <ul> | ||
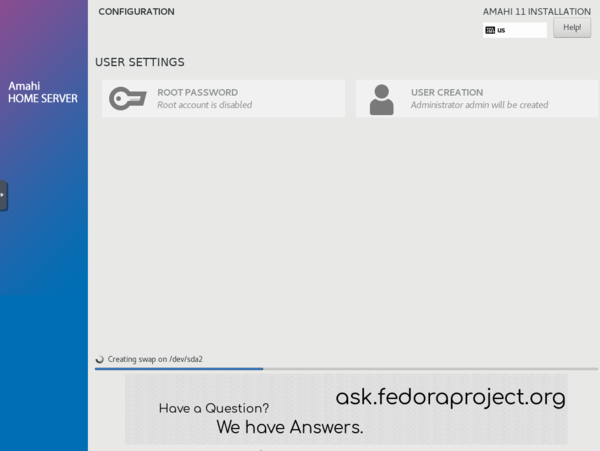
| − | <li> | + | <li>Now all of the configuration steps are complete. Sit back and watch the progress. |
| − | <div class="mw-collapsible mw-collapsed" data-collapsetext="{{int:Screenshot}}" | + | <div class="mw-collapsible mw-collapsed" data-collapsetext="{{int:Screenshot}}" style="width:600px"> |
| − | [[file: | + | [[file:A11E-SS8.PNG|600px]] |
</div><br></li> | </div><br></li> | ||
| − | + | <li>Once installation is complete, the machine will automatically reboot. You will next see see a black screen with no graphics displaying the Amahi 11 installation progress. When it's finished, the machine will again reboot automatically. | |
| − | <li>You | + | <div class="mw-collapsible mw-collapsed" data-collapsetext="{{int:Screenshot}}" style="width:400px"> |
| − | <div class="mw-collapsible mw-collapsed" data-collapsetext="{{int:Screenshot}}" | + | [[file:A11E-SS10.PNG|800px]] |
| − | [[file: | ||
</div><br></li> | </div><br></li> | ||
| − | + | <li>Once reboot is complete, you should have a fully functional home server using the IP address set up in your network! | |
| − | + | <div class="mw-collapsible mw-collapsed" data-collapsetext="{{int:Screenshot}}" style="width:400px"> | |
| − | + | [[file:A11E-SS11.PNG|200px]] | |
| − | |||
| − | <li> | ||
| − | <div class="mw-collapsible mw-collapsed" data-collapsetext="{{int:Screenshot}}" | ||
| − | [[file: | ||
</div><br></li> | </div><br></li> | ||
</ul> | </ul> | ||
| − | + | <br> | |
| − | |||
| − | |||
| − | |||
| − | |||
| − | |||
| − | |||
| − | |||
| − | |||
| − | |||
| − | |||
| − | |||
| − | |||
| − | |||
| − | |||
| − | |||
| − | |||
| − | |||
| − | |||
| − | |||
| − | |||
| − | |||
| − | |||
| − | |||
| − | |||
| − | |||
| − | |||
| − | |||
| − | |||
| − | |||
| − | |||
| − | |||
| − | |||
| − | |||
| − | |||
| − | |||
| − | |||
| − | |||
| − | |||
| − | |||
| − | |||
| − | |||
| − | |||
Next you need to transition your network to use it! | Next you need to transition your network to use it! | ||
| Line 188: | Line 112: | ||
Once installed, you will want to transition your network to using your Amahi server. Here are some of the things you should know: | Once installed, you will want to transition your network to using your Amahi server. Here are some of the things you should know: | ||
| − | + | <ul> | |
| − | + | <li>Your server will boot with the static IP you pre-configured in the Amahi control panel</li> | |
| − | + | <li>This is a headless server, therefore it will boot to a text console. There is no desktop user interface. '''Installing the Desktop (e.g. GNOME) interface will break DNS/DHCP and make the HDA as an unsuitable network server''' [[Amahi_8_Troubleshooting#Virtualization_Stack_Breaks_DNS.2FDHCP_Server|(details)]]</li> | |
| − | + | <li>It's strongly recommended you follow the [[transition to Amahi]] HDA guide to get your network fully working properly</li> | |
| − | + | <li>You can verify if the dashboard is available by accessing it from any client using the IP address of your server '''<nowiki>http://IPADDRESS/</nowiki>''' or '''<nowiki>http://hda/</nowiki>''' (in most Windows clients this works even without DNS from your HDA)</li> | |
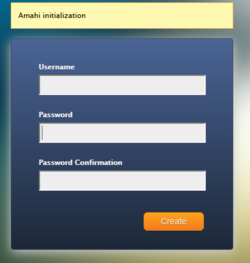
| − | + | <li>The first time you access the dashboard, you will need to login with user name and password as noted above in [[Amahi_11_Install#Prerequisites|Prerequisites]]. | |
| − | + | <div class="mw-collapsible mw-collapsed" data-collapsetext="{{int:Screenshot}}" style="width:400px"> | |
| − | + | [[file:A11-SS1.PNG|250px]] | |
| + | </div><br></li> | ||
| + | <li>Once you reach your dashboard, recommend you configure your HDA [[Setup|settings]], [[Storage_and_file_sharing|create/manage shares]], [[Adding_a_second_hard_drive_to_your_HDA|add more storage space]], install apps, etc. | ||
| + | <div class="mw-collapsible mw-collapsed" data-collapsetext="{{int:Screenshot}}" style="width:400px"> | ||
| + | [[file:A11-SS2.PNG|400px]] | ||
| + | </div><br></li> | ||
| + | <li>Optionally refer to [[Greyhole#Amahi_7.2F8|Greyhole]] to install/configure storage pooling.</li> | ||
| + | </ul> | ||
= Troubleshooting = | = Troubleshooting = | ||
Revision as of 01:07, 25 October 2018
Contents
Welcome to Amahi 11!
These instructions below will guide you through the Amahi 11 Express CD installation, step by step, with screenshots. This is the recommended method for quick download and fast setup.
Should the Amahi 11 Express CD not work for you, there are two alternate install methods for Fedora and Amahi 11: Minimal CD, so-called Netinstall or Full (DVD) install (provides additional hardware support).
NOTES:
- The only officially supported install media is Fedora 27 Server.
- Ensure your system meets the minimum hardware requirements for Amahi before proceeding.
- 32-bit installs are not available nor supported in Amahi 11.
- NOT ALL apps in previous Amahi versions are available for Amahi 11. Check the App Store before proceeding.
For assistance, visit the Amahi Forums or live support on the Amahi IRC channel.
Prerequisites
You need to obtain an install code (denoted YOUR-INSTALL-CODE below) from the Amahi control panel after configuring a profile for the system you are installing, with proper network configuration for your network.
Express CD is preconfigured as follows:
- LOCALIZATION:
- KEYBOARD: defaults to English (US).
- LANGUAGE: defaults to English.
- TIME AND DATE: defaults to server time zone.
- SOFTWARE: Minimal Install and should not be changed.
- INSTALLATION DESTINATION: defaults to the first hard drive in a multi-drive system.
- NETWORK & HOST NAME: detected automatically.
- USER SETTINGS: user admin is preconfigured with a password of administrator.
Download
- Amahi 11 Express CD (based on Fedora 27 Server) for 64 bit (577MB)
- Torrent - Amahi-11-x86_64.torrent
(MD5 e32fb303d6488e98078042dc2d162d08) - Direct Download - Amahi-11-x86_64.iso
(SHA1 cf972ec23f0c6b873884b80b4010b9b2b03be14a)
- Torrent - Amahi-11-x86_64.torrent
- Burn the ISO to CD/DVD (or USB), insert the media into your server, and boot the system.
- The instructions below have screen shots and commentary. If you are not an advanced Linux user and know what you are doing, recommend you DO NOT deviate from the guidance. Click [<Screenshot>] to show/hide the image.
Boot Screen
- Select Install Amahi 11

Language Selection
- Choose desired language and select Continue


Installation Summary
- The INSTALLATION SUMMARY screen will appear. It may take a few minutes to finish Downloading package metadata

- Choose AMAHI SERVER SETUP and enter YOUR-INSTALL-CODE obtained earlier followed by Done.

- Select KEYBOARD and choose the default layout followed by Done.
- If your keyboard layout is not listed, select the plus sign (+) and add the desired layout.
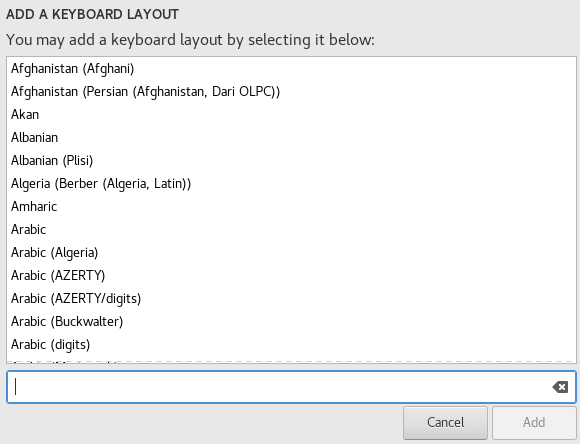
- Choose the desired layout followed by Done.
- Verify:
- TIME & DATE and change to match your locale if needed.
- INSTALLATION DESTINATION indicates the correct hard drive if you have more than one connected.
- NETWORK & HOST NAME indicates connected. Don't make any changes unless you are sure of what you are doing.


Begin Installation
- Back to the INSTALLATION SUMMARY and ready to begin installation. Select Begin Installation

Installation Progress
- Now all of the configuration steps are complete. Sit back and watch the progress.
- Once installation is complete, the machine will automatically reboot. You will next see see a black screen with no graphics displaying the Amahi 11 installation progress. When it's finished, the machine will again reboot automatically.

- Once reboot is complete, you should have a fully functional home server using the IP address set up in your network!


Next you need to transition your network to use it!
Transitioning to your Amahi server
Once installed, you will want to transition your network to using your Amahi server. Here are some of the things you should know:
- Your server will boot with the static IP you pre-configured in the Amahi control panel
- This is a headless server, therefore it will boot to a text console. There is no desktop user interface. Installing the Desktop (e.g. GNOME) interface will break DNS/DHCP and make the HDA as an unsuitable network server (details)
- It's strongly recommended you follow the transition to Amahi HDA guide to get your network fully working properly
- You can verify if the dashboard is available by accessing it from any client using the IP address of your server http://IPADDRESS/ or http://hda/ (in most Windows clients this works even without DNS from your HDA)
- The first time you access the dashboard, you will need to login with user name and password as noted above in Prerequisites.
- Once you reach your dashboard, recommend you configure your HDA settings, create/manage shares, add more storage space, install apps, etc.

- Optionally refer to Greyhole to install/configure storage pooling.


Troubleshooting
Visit the troubleshooting page if you find yourself in trouble.
Reference
Refer to the HDA Admin How To page for Amahi Server administrator guidance.
Go back to Amahi Docs page.