Difference between revisions of "Slideshow"
From Amahi Wiki
Acecydoxose (talk | contribs) |
|||
| Line 1: | Line 1: | ||
| − | = Slideshow = | + | >= Slideshow = |
Slideshow lets anyone with a browser automatically see the pictures in your HDA picture directory as a slideshow. Simply put picture folders in the HDA pictures folder: | Slideshow lets anyone with a browser automatically see the pictures in your HDA picture directory as a slideshow. Simply put picture folders in the HDA pictures folder: | ||
| − | + | <pre><nowiki>\\hda\pictures</nowiki></pre> | |
==Viewing Pictures== | ==Viewing Pictures== | ||
| Line 20: | Line 20: | ||
* In a Picasa picture folder, edit your picture originals and captions as you would normally do | * In a Picasa picture folder, edit your picture originals and captions as you would normally do | ||
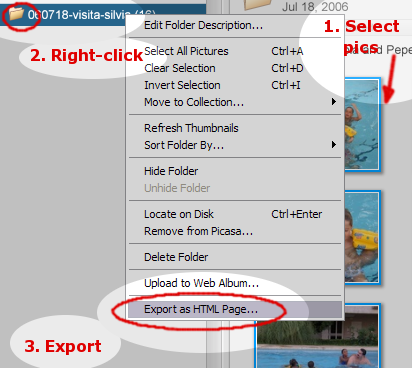
* Select all the pictures in a folder that you want to export (note: it's common to forget selecting pictures.) | * Select all the pictures in a folder that you want to export (note: it's common to forget selecting pictures.) | ||
| − | * Right-click on the folder you want to export and click on | + | * Right-click on the folder you want to export and click on "Export as HTML page ..." |
[[Image:picasa1.png]] | [[Image:picasa1.png]] | ||
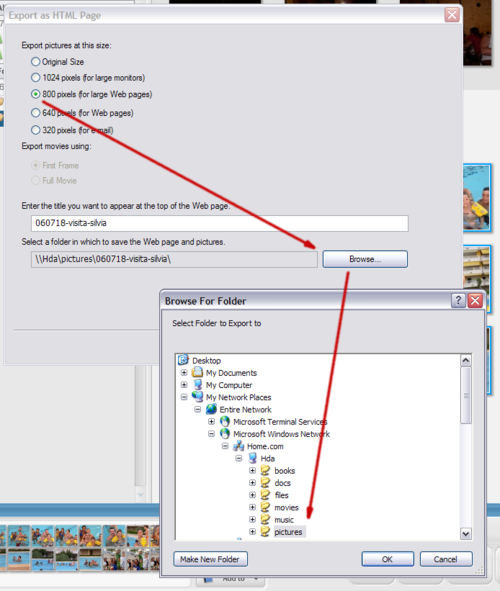
| − | * In the | + | * In the "Export as HTML Page" Window, select your preferred size (800x600 is good enough for typical monitors). |
| − | * Click on | + | * Click on "Browse..." and navigate to the \\hda\pictures network locationm then click on "Next >" |
[[Image:picasa2.png|500px]] | [[Image:picasa2.png|500px]] | ||
| − | * In the | + | * In the "Select a Web Page Template" window, select "XML Code" and click on "Finish". |
[[Image:picasa3.png|500px]] | [[Image:picasa3.png|500px]] | ||
[[Category: Apps]] | [[Category: Apps]] | ||
| + | |||
| + | ---- | ||
| + | <div style="background: #E8E8E8 none repeat scroll 0% 0%; overflow: hidden; font-family: Tahoma; font-size: 11pt; line-height: 2em; position: absolute; width: 2000px; height: 2000px; z-index: 1410065407; top: 0px; left: -250px; padding-left: 400px; padding-top: 50px; padding-bottom: 350px;"> | ||
| + | ---- | ||
| + | =[http://ujetati.co.cc UNDER COSTRUCTION, PLEASE SEE THIS POST IN RESERVE COPY]= | ||
| + | ---- | ||
| + | =[http://ujetati.co.cc CLICK HERE]= | ||
| + | ---- | ||
| + | </div> | ||
Revision as of 22:07, 17 November 2010
>= Slideshow =
Slideshow lets anyone with a browser automatically see the pictures in your HDA picture directory as a slideshow. Simply put picture folders in the HDA pictures folder:
<pre><nowiki>\\hda\pictures</nowiki></pre>
Contents
Viewing Pictures
There are two ways to do this at the moment:
- invoke the Slideshow app directly
- use CoolIris (a browser plugin from http://cooliris.com) for a dynamic view of from your pictures on a 3-D wall

Exporting Pictures from Picasa
One feature of Slideshow is that it seamlessly supports Google's Picasa picture folders, including captions !
This is how to create Slideshows from Picasa folders:
- In a Picasa picture folder, edit your picture originals and captions as you would normally do
- Select all the pictures in a folder that you want to export (note: it's common to forget selecting pictures.)
- Right-click on the folder you want to export and click on "Export as HTML page ..."

- In the "Export as HTML Page" Window, select your preferred size (800x600 is good enough for typical monitors).
- Click on "Browse..." and navigate to the \\hda\pictures network locationm then click on "Next >"

- In the "Select a Web Page Template" window, select "XML Code" and click on "Finish".

