Hosting a website
NOTICE: making anything visible outside your network can open security issues, so you are doing this at your own risk. Some apps are more secure than others, but there is nothing ultimately secure. Best is to use the VPN to login back home.
To access the HDA itself from outside the network using VPN, check out the OpenVPN ALS application, available to install through the HDA. It enables you to access the HDA, and all applications and folders, using just your free username.yourhda.com webaddress.
So you want to run a web server in your Amahi server and make it visible from the web outside your home.
Contents
Requirements
For the purposes of this guide you need either of the following:
- VNC access to your HDA if headless
- Terminal is available under Applications -> System Tools -> Terminal
- SSH if headless and no VNC
- A monitor if you are not headless
To host your own web site you need the following:
- Forward a port to your HDA ip address, either for plain insecure http: 80, for https, 443 (advanced users can use other ports). Some routers call this or require a "virtual server"
- Chose a domain name that you own (or your free username.yourhda.com that comes with Amahi). This is how the app will be accessed outside
- Chose the app you want to make accessible outside, let's say, yourwebappname
Hosting a single Webapp
What you need to do in a terminal (as root) is find the apps conf file then edit the conf file for the app:
su -
ls /etc/httpd/conf.d
- NOTE: If you get a message like "ls: cannot access /etc/httpd/conf.d: No such file or directory", simply use the following to manually change directories:
cd /etc/httpd/conf.d
ls
Find your app .conf file. It will look like 10##-yourwebappname.conf
nano /etc/httpd/conf.d/10##-yourwebappname.conf
- NOTE: Depending on the options you chose during installation, you may not have the "nano" text editor installed. If that is the case, you will receive an error message. Instead, substitute "vi" for "nano" to use a different text editor. Here are the commands to use the "vi" editor.
Your conf file should look something like this at the top of the page:
<VirtualHost *:80>
        ServerName app
        ServerAlias app.YourDomain.lan
</VirtualHost>
Add this (immediately after the ServerName directive):
ServerAlias username.yourhda.com
So it looks like this:
<VirtualHost *:80>
        ServerName app
        ServerAlias app.YourDomain.lan
        ServerAlias username.yourhda.com
</VirtualHost>
You can add more server aliases if you want to access the app under those names (for example: ServerAlias myphotos.DomainName.com). Once you are satisfied with the server aliases, you may save and quit nano by following these steps in Windows:
    ctrl X
    At the prompt, type "y" to save
    At the prompt, hit "Enter" to save the file
Restart the server using:
- Fedora
systemctl restart httpd.service
- Ubuntu
sudo service apache2 reload
And you are done, enjoy your website.... or are you?
WARNING: Some apps will work right out of the box so to speak with these steps. Others however, (such as mediawiki) will require additional work before you can visit them on the internet. You will need to edit the apps config file to change the server address of that app. We will use mediawiki as an example.
So suppose I have a domain name, which is pointed at my hda - and I set up a subdomain that for the mediawiki app. We'll call it mediawiki.myname.com. After installing media wiki, I need to go
sudo vi /var/hda/web-apps/mediawiki/html/LocalSettings.php
And scroll down to
## The protocol and server name to use in fully-qualified URLs
$wgServer           = "http://mediawiki";
then change to
$wgServer = "http://mediawiki.myname. com";
then enter these commands:
sudo rm -r /etc/lock/apache2
sudo php /var/hda/web-apps/mediawiki/html/maintenance/Update.php
sudo service apache2 restart
Now you should be able to view http://mediawiki.myname.com from inside your network and on the internet as well.
Hosting Multiple Webapps
If you wish to have access to multiple webapps, described below is one way to accomplish this (NOTE: Requires a dnynamic DNS provider in addition to Amahi username.yourhda.com):
- obtain a domain name (i.e., via godaddy.com) --for example yourdomain.com
- for each web app you wish to have access to, establish a CNAME or subdomain--for example something.yourdomain.com---and point it to username.yourhda.com (for example see http://help.godaddy.com/article/679 )
- edit the webapp .conf file (see above) to match the CNAME/subdomain you just established by adding ServerAlias something.yourdomain.com
- don't forget to restart the server each time you edit a .conf file.
- For example, you could create the subdomain/CNAME: address.yourdomain.com for the AddressBook webapp---point that subdomain to: username.yourhda.com---in the AddressBook .conf file add: ServerAlias address.yourdomain.com---restart the server---you are done, enjoy using multiple webapps!
Even if you have a dynamic IP address from your ISP, this can still be done - rather inexpensively. Some dynamic DNS services, like DynDNS, allow for you to create a domain and use something called a wildcard DNS record. This acts much like the subdomain created above, but you can literally use anything you want so long as the server is set to answer to the request. Below, we'll outline the basic steps needed to accomplish this.
Some routers (Netgear, Linksys, etc.) allow you to set up credentials for your dynamic DNS service account so that it'll update the dynamic DNS service for you. If you don't have that ability, you may have to run a client-side application on a computer inside your network which will send out regular updates to do the same thing. Figure out if you will be updating the dynamic DNS service via the router or a client-side app. Once you've confirmed you can utilize this technology, in one form or another, proceed with the rest of these basic steps.
- Obtain a paid DynDNS account.
- At the time of this writing, DynDNS is calling it their Pro account.
- Basic accounts will not allow you to use wildcards.
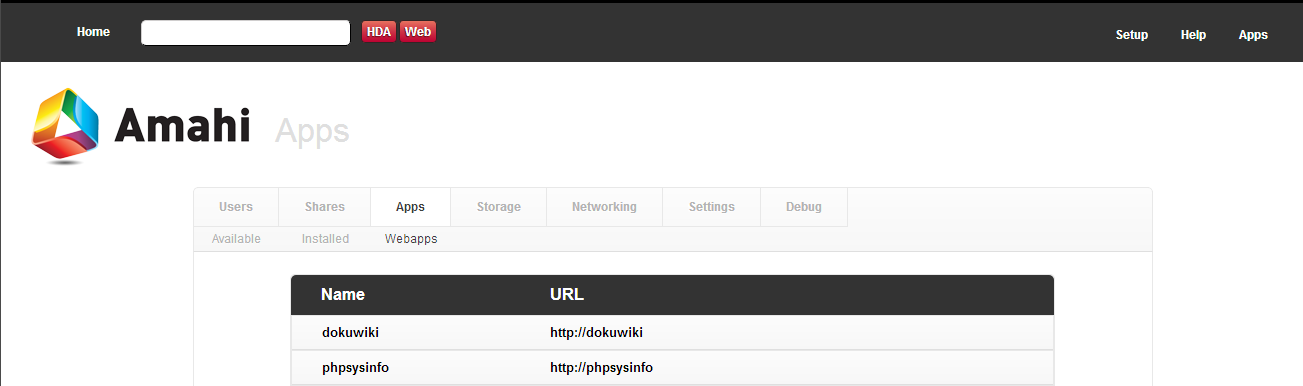
- In your Amahi's web-GUI, navigate to your Webapps section via Apps > Webapps (Ubuntu). The Amahi Web App provides this functionality in Amahi 7.
- In our case, we'll be allowing our Dokuwiki to answer to our wildcard DNS record so expand it by clicking on it.
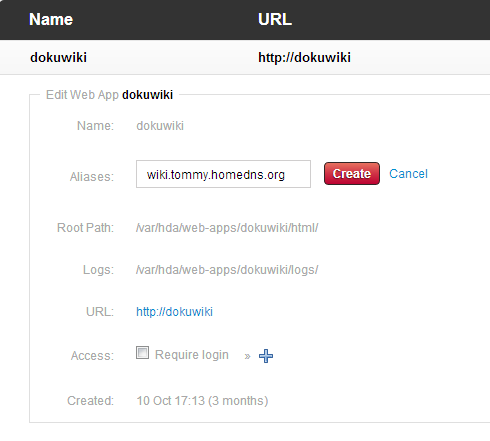
- This will show several options to edit but we're only going to add an alias.
- Click on New Alias.
- Enter your wildcard like what we have in our example.
- If your DynDNS account is tommy.homedns.org, you'll enter something like wiki.tommy.homedns.org. Again, DynDNS allows for wildcards so you can make up stuff all day long!
- This will show several options to edit but we're only going to add an alias.
You should be able to test this by now however, it may prove difficult to accurately test it from inside your own network. In that case, bug your friend down the street to see if they can get to it or do it yourself at a later date.
For the curious: So, what did this do? Well, what it did was add a ServerAlias directive to the Apache configuration. (In MS-IIS, it's called a host header or a binding.) You can have as many ServerAlias' as you'd like. So, if you wanted to take a look under the hood, you would open a terminal window on your server (or SSH to it) and do a directory listing of /etc/httpd/conf.d/.
user@ubuntu-amahi1:~$ ls -l  /etc/httpd/conf.d/
total 28
-rw-r--r-- 1 root     root       21 Oct 10 18:46 00-init.conf
-rw-r--r-- 1 root     root     2231 Oct 10 18:46 01-platform.conf
-rw-r--r-- 1 root     root      516 Oct 10 18:46 03-calendar.conf
-rw-rw-r-- 1 nobody   nogroup   518 Feb  1 09:20 1000-dokuwiki.conf
-rw-rw-r-- 1 www-data users     492 Oct 10 21:14 1001-phpsysinfo.conf
-rw-rw-r-- 1 www-data users     489 Oct 10 21:18 1002-subsonic.conf
user@ubuntu-amahi1:~$
In our case, when we installed the Dokuwiki app, it created 1000-dokuwiki.conf. Open that and you'll see the ServerAlias that was added.
user@ubuntu-amahi1:~$ nano /etc/httpd/conf.d/1000-dokuwiki.conf
<VirtualHost *:80>

        ServerName dokuwiki
        ServerAlias dokuwiki.home.local

        ServerAlias wiki.tommy.homedns.org

        DocumentRoot /var/hda/web-apps/dokuwiki/html

        <Directory "/var/hda/web-apps/dokuwiki/html">
                Options Indexes FollowSymLinks +ExecCGI
AddHandler fcgid-script .fcg
AllowOverride FileInfo Limit Options Indexes
Order allow,deny
Allow from all

        </Directory>

        ErrorLog  /var/hda/web-apps/dokuwiki/logs/error_log
        CustomLog /var/hda/web-apps/dokuwiki/logs/access_log combined env=!dontlog

</VirtualHost>
You can see that adding that ServerAlias added the line: ServerAlias wiki.tommy.homedns.org
Hosting Webapps (Change Port)
This is an alternate method for hosting single or multiple web apps using the builtin Amahi dynamic DNS (username.yourhda.com). This will likely work with other dynamic DNS providers.
You can change the port that most web apps operate, specifically port 80. You can use any port not already in use by the OS or your HDA. To verify what ports are already in use, do (as root user):
nmap -sT -O localhost
Once you have chosen the port to use, follow the steps below (using Adminer as an example and port 8081):
- Edit /etc/httpd/conf.d/####-adminer.conf and add the following line. Also change 80 to 8081 in the VirtualHost line:
Listen 8081
<VirtualHost *:8081>
- Update the ServerAlias:
ServerAlias adminer.amahi.net:8081
- Add right below ServerAlias to use the Amahi dynamic DNS:
ServerAlias username.yourhda.com:8081
- Restart web server:
systemctl restart httpd
Forward port 8081 on the router of course to access from outside the network. Anytime you access the app on your network internally, navigate to http://adminer.amahi.net:8081.
- NOTE: amahi.net part of the URL may be different depending on the domain you use for your HDA.
To change the app back to using port 80, remove the Listen line and change the port to 80 in /etc/httpd/conf.d/####-adminer.conf.
I would not recommend you try this with apps that do not use port 80. For example, an application that uses the web server proxy will most certianly not work with this method.
Hosting a Website
Prerequisites: The first order of business is to make sure that your domain name is pointing to your server's IP address. Each website is different, but GoDaddy goes like this:
- Go to your GoDaddy's My Account page. Under Dashboard, click yourdomain.com
- Point your cursor at the Nameserver icon, click Set Nameservers
- Select I want to forward my domains and click OK
- Now go back to your account homepage, and instead of clicking yourdomain.com, check it and click View in Domain Manager
- Click yourdomain.com
- Scroll down to DNS Manager and click Launch
- Under A(Host) edit the IP Address(es) to reflect the IP Address of your server. Hit enter and then Save Zone File when that option appears.
- The effects should appear within one hour
- Go to your GoDaddy's My Account page. Under Dashboard, click yourdomain.com


Hosting: Hosting a website on your HDA server is basically the same as hosting a webapp, so if we are able to do the previous guides on hosting a webapp(s) the rest will be a cinch.
We will create the website by creating a webapp. This is a lot easier than it sounds, so don't give up just yet!
- Got your HDA page (http://hda or http://hda.yourhda.com), click Setup and go to Settings.
- Make sure your Advanced Settings option is checked (if not, check and click OK past the warning)
- Go to Apps and then Webapps (Amahi 6). The Amahi Web App application provides this functionality in Amahi 7.
- At the very bottom, click New Web App and type in a name like Website
- This is where your webpage will reside in, you can name this anything you'd like. This is not the title of your website or webpage. Website will be used as the name for this guide

- Do everything as told under the "Hosting a single Webapp" heading above, but of course our app is called Website.
- Hint: Instead of using user.yourhda.com for your ServerAlias, go ahead and use yourdomain.com (without the www.) if you have one from, for example, GoDaddy.
- To easily access your website files, we will make the webapp folder a share by doing the following:
- In your HDA Dashboard, click Setup and then Shares
- Click New Share at the very bottom
- We will name our share Website
- Notice that the path is automatically filled out for us. This is not the path that will be used, so the path that will be typed in will be /var/hda/web-apps/Website/
- Click Create this Share, now the folder will be available from your normal \\hda spot.
- You can test your new website by creating an index.html (put something simple, like "hi", as a text) in the html folder in your Website share folder, and then going to yourdomain.com

And we are finished. To create your website on Fedora, we can use Bluefish program.
- yum install bluefish
If we would like to use Windows, we can use any program to make the website. Just drag and drop into the share, and under the folders as needed.
More Secure Access
To enable https access to your apps, you can follow the techniques in Secure App Access page.
NOTE: Recommend exercising extreme caution with this tutorial as it has been known to cause problems.
FAQ
- Q: Do i need to do anything for
username.yourhda.comto work?
No. That comes free and automatically set up with your Amahi HDA
- Q: What if i want to do it for a .html or .php file?
     You can do this by creating a Webapp of your own. In the apps tab,
     select Webapps and create a new one.
     What you do is, create a web app, and put the files into the root
     directory of the webap, something like this directory:
/var/hda/web-apps/yourwebappname/html
     this directory belongs to apache. you will have to change the
     ownership to your user (recommended) or otherwise add things as root.
- Q: How do I change the ownership?
You can do this by going to the command screen:
        su -
        {password}
        chown {user} /var/hda/web-apps/
Troubleshooting
- Q: When I go to myusername.yourhda.com I get my router's homepage instead of my hda. How do I fix that?
If you see your router's page, that means the forwarding did not take place from the external port to the internal port in your HDA
- Q: I do not see the app I want when accessing myusername.yourhda.com
This may be because the corresponding virtualhost does not have the name you expect on it, or because another virtualhost already has it and happens to take over