Difference between revisions of "Access Joomla over HTTPS"
From Amahi Wiki
| (11 intermediate revisions by 4 users not shown) | |||
| Line 1: | Line 1: | ||
| − | + | [[image:Joomla_logo.jpg]] | |
| − | |||
| + | '''NOTE:''' This has not been tested with Amahi 7 or greater. Following this guidance is at your own risk and could break your HDA. | ||
=Step 1 - Setting up port forwarding= | =Step 1 - Setting up port forwarding= | ||
| + | * Forward port 443 to your HDA IP address (example: 192.168.2.10) | ||
| − | + | =Step 2- Install ssl module= | |
| + | * Type the following command | ||
| + | **<code>yum -y install mod_ssl</code> | ||
| + | =Step 3 - Create Certificate= | ||
| − | + | * Go to your config file for apache, | |
| + | **<code>cd /etc/httpd/conf/</code> | ||
| + | * create a key and a self-signed certificate | ||
| + | **<code>openssl genrsa -out filename.key 1024</code> | ||
| + | **<code>openssl req -new -key filename.key -x509 -days 1000 -out filename.crt</code> | ||
| − | + | =Step 4 - Edit httpd config files= | |
| − | |||
| − | |||
| + | * Go to the folder /etc/httpd/conf | ||
| + | ** <code>cd /etc/httpd/conf</code> | ||
*** You can type <code>ls</code> to list the files. | *** You can type <code>ls</code> to list the files. | ||
* Edit httpd.conf | * Edit httpd.conf | ||
| − | |||
** <code>nano httpd.conf</code> | ** <code>nano httpd.conf</code> | ||
* Insert a new line with the following: | * Insert a new line with the following: | ||
| − | |||
** <code>NameVirtualHost *:443</code> | ** <code>NameVirtualHost *:443</code> | ||
* Save httpd.conf | * Save httpd.conf | ||
| − | |||
** control+O | ** control+O | ||
* Exit nano | * Exit nano | ||
| − | |||
** control+X | ** control+X | ||
| + | =Step 5 - Edit Joomla config files= | ||
| − | + | * Go to the folder /etc/httpd/conf.d | |
| − | + | ** <code>cd /etc/httpd/conf.d</code> | |
| − | |||
| − | * Go to the folder etc/httpd/conf.d | ||
| − | |||
| − | ** <code>cd etc/httpd/conf.d</code> | ||
| − | |||
*** You can type <code>ls</code> to list the files. | *** You can type <code>ls</code> to list the files. | ||
* Edit the joomla config file | * Edit the joomla config file | ||
| − | |||
** <code>nano ****-joomla.conf</code> | ** <code>nano ****-joomla.conf</code> | ||
| − | |||
*** ''(note that the number may change for you)(example: 1006-joomla.conf)'' | *** ''(note that the number may change for you)(example: 1006-joomla.conf)'' | ||
* Add the following text on a new line: | * Add the following text on a new line: | ||
| + | <pre><VirtualHost *:443> | ||
| + | ServerName joomla | ||
| + | ServerAlias username.yourhda.com:443 | ||
| − | + | SSLEngine On | |
| + | SSLCertificateFile /etc/httpd/conf/filename.crt | ||
| + | SSLCertificateKeyFile /etc/httpd/conf/filename.key | ||
| − | + | DocumentRoot /var/hda/web-apps/joomla/html | |
| − | |||
| − | + | <Directory "/var/hda/web-apps/joomla/html"> | |
| − | + | Options Indexes FollowSymLinks +ExecCGI | |
| − | + | AddHandler fcgid-script .fcg | |
| − | + | AllowOverride AuthConfig | |
| − | + | Order allow,deny | |
| − | + | Allow from all | |
| − | + | </Directory> | |
| − | |||
| − | |||
| − | |||
| − | |||
| − | |||
| − | |||
| − | |||
| − | |||
| + | </VirtualHost></pre> | ||
* Save your web-app.conf | * Save your web-app.conf | ||
| − | |||
** control+O | ** control+O | ||
* Exit nano | * Exit nano | ||
| − | |||
** control+X | ** control+X | ||
| − | |||
| − | |||
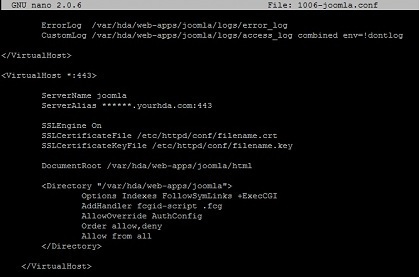
[[image:1006-joomlaconf.jpg]] | [[image:1006-joomlaconf.jpg]] | ||
| − | + | =step 6 - Restart httpd service= | |
| − | |||
| − | =step | ||
| − | |||
* Restart your httpd service by issuing the following: | * Restart your httpd service by issuing the following: | ||
| − | |||
** <code>service httpd restart</code> | ** <code>service httpd restart</code> | ||
| − | |||
<strong>Enjoy</strong> | <strong>Enjoy</strong> | ||
| + | [[image:joomla.jpg]] | ||
| − | [[ | + | = See also = |
| + | [[Access HDA over SSL]] | ||
Latest revision as of 01:01, 25 March 2016
NOTE: This has not been tested with Amahi 7 or greater. Following this guidance is at your own risk and could break your HDA.
Contents
Step 1 - Setting up port forwarding
- Forward port 443 to your HDA IP address (example: 192.168.2.10)
Step 2- Install ssl module
- Type the following command
yum -y install mod_ssl
Step 3 - Create Certificate
- Go to your config file for apache,
cd /etc/httpd/conf/
- create a key and a self-signed certificate
openssl genrsa -out filename.key 1024openssl req -new -key filename.key -x509 -days 1000 -out filename.crt
Step 4 - Edit httpd config files
- Go to the folder /etc/httpd/conf
cd /etc/httpd/conf- You can type
lsto list the files.
- You can type
- Edit httpd.conf
nano httpd.conf
- Insert a new line with the following:
NameVirtualHost *:443
- Save httpd.conf
- control+O
- Exit nano
- control+X
Step 5 - Edit Joomla config files
- Go to the folder /etc/httpd/conf.d
cd /etc/httpd/conf.d- You can type
lsto list the files.
- You can type
- Edit the joomla config file
nano ****-joomla.conf- (note that the number may change for you)(example: 1006-joomla.conf)
- Add the following text on a new line:
<VirtualHost *:443>

               ServerName joomla
               ServerAlias username.yourhda.com:443

               SSLEngine On
               SSLCertificateFile /etc/httpd/conf/filename.crt
               SSLCertificateKeyFile /etc/httpd/conf/filename.key

               DocumentRoot /var/hda/web-apps/joomla/html

               <Directory "/var/hda/web-apps/joomla/html">
                       Options Indexes FollowSymLinks +ExecCGI
                       AddHandler fcgid-script .fcg
                       AllowOverride AuthConfig
                       Order allow,deny
                       Allow from all
               </Directory>

         </VirtualHost>
- Save your web-app.conf
- control+O
- Exit nano
- control+X
step 6 - Restart httpd service
- Restart your httpd service by issuing the following:
service httpd restart
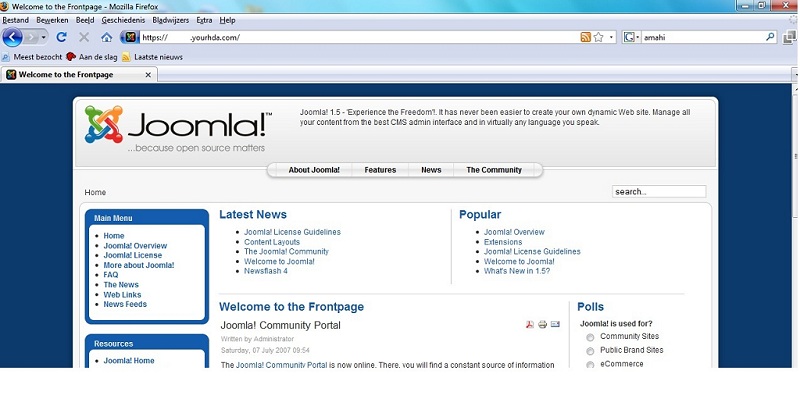
Enjoy


