Difference between revisions of "User:Jack Palmadesso"
| Line 102: | Line 102: | ||
#Now just browse to the location where the ISO is located and select your OS type in the dropdowns | #Now just browse to the location where the ISO is located and select your OS type in the dropdowns | ||
#*[https://lh4.googleusercontent.com/-si2UbG9im60/Tqd-ZBEb_oI/AAAAAAAADB0/gmhjqG8BhEE/s912/14media_ostype.png Image14] | #*[https://lh4.googleusercontent.com/-si2UbG9im60/Tqd-ZBEb_oI/AAAAAAAADB0/gmhjqG8BhEE/s912/14media_ostype.png Image14] | ||
| − | # | + | #Enter the amount of RAM and number of CPUs you would like for this VM. This is where the 64 bit OS becomes comes in handy. Otherwise your VM would be starved for RAM right off the get go. |
| + | #*[https://lh3.googleusercontent.com/-NqOynJ2XrFs/Tqd-ZhwMCsI/AAAAAAAADB4/1_ZC1ZrKms4/s912/15vm_resources.png Image15] | ||
| + | #At this point the VM wizard is asking for a disk to install the VM on. Select the managed storage and hit browse. | ||
| + | #*[https://lh4.googleusercontent.com/-SsWFTpfeofc/Tqd-Z8cz2-I/AAAAAAAADCY/FAHOdLSqTqA/s912/16storage_browse.png Image16] | ||
| + | #Notice the interface that is very similar to what we used earlier. Select the storage you created earlier and hit Choose Volume at the bottom right corner. | ||
| + | #*[https://lh5.googleusercontent.com/-gEhcjng_GsY/Tqd-ae95ykI/AAAAAAAADCE/VSKmUTHkOHU/s912/17pick_storage.png Image17] | ||
| + | #The selection should look similar to mine | ||
| + | #*[https://lh4.googleusercontent.com/-llgEFbUDn1A/Tqd-aknJtLI/AAAAAAAADCI/cEYIZpvCKGc/s912/18storage_chosen.png Image18] | ||
| + | #Now we are almost there check the box "customize configuration before install" also make sure the Architecture is correct. This tends to be wrong so double check the default. | ||
| + | #*[https://lh5.googleusercontent.com/-65mjmA6RqPc/Tqd-bVYqg_I/AAAAAAAADCU/x3_VedvP79o/s912/19almost_done.png Image 19] | ||
| + | #You will get an overview window. Fill in a description if you like. | ||
| + | #*[https://lh5.googleusercontent.com/-RFQcUp0_dKM/Tqd-bz-TgKI/AAAAAAAADCo/S6XzZnr0HZM/s912/20overview.png Image20] | ||
| + | #Select the Processor field on the left and open the "Configuration" by clicking the arrow. The hit "Copy Host CPU Configuration" | ||
| + | #*[https://lh3.googleusercontent.com/-8ORfMfPEi38/Tqd-cUf_NTI/AAAAAAAADCk/k84IhCsr1tY/s912/21proc_values.png Image21] | ||
| + | #*I am not even sure if this is nessasary but I do it. | ||
| + | #Hit Begin Install at the top to start the VM installation. | ||
| + | #*[https://lh3.googleusercontent.com/-qt0E0xXp9YE/Tqd-cy-bBgI/AAAAAAAADDE/5vEwUkizt50/s912/22begin_install.png Image22] | ||
| + | #You should be off and running. Mine booted to the install screen and eventually Anaconda | ||
| + | #*[https://lh4.googleusercontent.com/-yvxG62bAhqA/Tqd-dYMmyRI/AAAAAAAADC0/dUR1i9RBs1s/s912/23booting_vm.png Image23] | ||
| + | #*[https://lh5.googleusercontent.com/-2thyMZrsoRE/Tqd-djTduMI/AAAAAAAADC4/o6kX2rdEWqM/s912/24anaconda.png Image24] | ||
| + | |||
| + | ==Problems== | ||
| + | Most of the problems I've run into are related to SELinux policy. Depending on your distro of choice you may or may not get these. Since Fedora uses SELinux by default you run a good chance of getting blocked by it. Don't panic. SELinux troubleshooting is pretty good. If you get an alert click the details and it will tell you exactly what to do. Run the commands and you should be good to go. I ran into a few myself but I ironed them out before I ran through this install. | ||
| + | |||
| + | ==Don't forget to update your VM== | ||
| + | First thing to do is to install all the updates to your new VM. This will close any holes that exist. | ||
| + | |||
| + | ==VM integration== | ||
| + | Your VM will be assigned a private network address by KVM. Normally its 192.168.22.X This address will be NATed by default to the network the host is attached to. In my case my host machine called KVM is on my network with my Amahi HDA as well as alot of other devices. I assigned KVM a static address in the Amahi control panel just because its a server. You don't have to if you don't want to. Whats cool is that the VM uses all the network information from the Host. This means that your new VM is effectivly on your network and will resolve all the home devices via the DNS server in Amahi. You can also create an alias in the Amahi networking panel so its possible to reach the VM from anyplace. It rounds things out nicely. | ||
| + | |||
| + | ==Conclusions== | ||
| + | Hopefully you guys get something out of this. KVM is a real alternative to any of the competing virtualization products. I prefer it because its already part of the OS. This is not an immature product. It will work well and "just works" No extra drivers or layers to install. The VM just knows what to do and acts correctly. | ||
| + | |||
| + | I have really just scratched the surface of whats possible. To get an idea as root on the host type in the command "virsh" Then type help. You will get a list of what is possible. Hardware additions, resource addidtions like RAM on the fly can be performed. Snapshots are possible thanks to LVM storage pools. Rollbacks can be performed and lots of things in between. My job as a Linux sysadmin has given me the knowledge to work with most of these things. Hopefully this writeup has passed on some of that knowlege. Its not difficult but you have to do it perfectly. You know its a computer and it does not forgive. | ||
| + | |||
| + | Cheers | ||
| + | Jack | ||
Revision as of 04:47, 26 October 2011
Contents
Intro
The following tutorial is a pretty advanced topic. I will attemmpt to do my best in being as clear as possible but you need to be warned that if you have not worked with Linux for very long you might get lost.
For a few years now the Linux kernel has had the ability to run virtual machines natively. Most people think of Vmware or Virtual Box when they want to run virtual machines. These are good products and have come a long way in making virtualization a reality. While it is possible to get these products for "free" and use them there are drawbacks to using these products. For the most part these mainstream products are streamlined and present a nice gui to an end user. These usually do a good job in making the complex task of virtualizing a machine simple but there are drawbacks. The "free" versions usually disable some really nice features like "snapshots" or they might restrict the amount of resources that can be assigned to a Virtual Machine.
There are also the problems. The guis can be a bit buggy and not always work correctly. Of course support is not going to be possible so you will have to live with the problems until the next update. With Vmware and Virtual Box there are also some packages that need to be installed in the guest to make them work "properly". This is usually some form of driver that makes the Virtual Machine aware its being virtualized or presents a layer to trick the Virtual Machine into thinking its on some real hardware.
I am not knocking these products. There are quite a few out there now and its really amazing how far they have come. I actually remember around the year 2000 when Vmware was giving away its product for free with Suse Linux. They were the only one in the space at that time. Now there are dozens of products and most of them work pretty well. At this point in time virtualization is just a fact so the various OS vendors are now building vitualization into thier product. Microsoft has Hyper-V, Oracle has Virtual Box and Solaris Zones, and all Linux distros have the ablility to run either Xen, or KVM based virtual machines. Xen is on the decline in favor of KVM now.
Its pretty safe to say that if you use the native products that are built into the OS you will enjoy an advantage over a product that you add-on. Think Microsoft and Internet Explorer or Apple and iTunes. These applications will enjoy lots of advatages over competing products because they can take advantage of some unpublished hooks. These hooks will give the native applications many advantages over competing products that are installed afterwords. Native Virtualization is no exception to this rule. This is especially true if the VM is the same OS as the Host OS.
The purpose of this wiki page is to give Amahi developers an intro to native Linux virtualization. Any Linux distribution can be used. Its only a matter of installing the right packages. These days with YUM and APT its only a command or two away and you don't even need to reboot. Take that Microsoft !!
Seriously though I hope you all get something out of this. I've been working with Linux for a long time now (10+ years) and I make my living now from working with it daily. As the Suse guys say "Have alot of fun!"
Prepare Prepare Prepare!!
This is going to take some time so get yourself comfortable. Maybe get some music going in the background and get a drink or something, seriously. For this example I am using the Host or Hypervisor is running on Fedora 15 x64. Do yourself a favor and make the Host 64 bit because you really need to take advantage of the RAM. Here are my Host/Hypervisor specs:
- Dual core 3ghz proc
- 4gb RAM
- 80 gb OS drive (Fedora 15 X64 Installed)
- 160 gb drive (to be used for the VM images)
Nothing special about it right, but to take advantage of the 4gb or RAM you need 64 bit, especially if you have more RAM than I have here. As I mentioned I am using Fedora which is what Amahi users are used to so this will be biased towards Fedora.
You will need the following information which will be used later on
- Enable Virtualization in your BIOS !! Don't overlook this !!
- If there is no virtualization options in your bios then either your board or cpu do not support it. If that is the case then stop here because your experience will be poor at best.
- Update your System !! If you get a new kernel its best to reboot.
- su -c yum -y update
- Install the needed Packages
- su -c yum -y install kvm virt-manager qemu-kvm.x86_64 qemu-kvm-tools.x86_64 qemu.x86_64 qemu-common.x86_64 qemu-kvm.x86_64 qemu-kvm-tools.x86_64 sheepdog.x86_64 virt-v2v.x86_64 mc nmap
- This might take some time so take a break or something
- Your Drive ID or model number.
- You can get this by installing the "sdparm" package
- sdparm /dev/sdb
- Copy down the model number
- In my case: sudo -c sdparm /dev/sdb
- /dev/sdb: ATA ST3160815AS 3.AA
- You want the stuff in bold recorded somplace
- You can also get this same info from the "Disk Utility" app which is gui based.
- Once all the packages are installed you need to check some things.
- Make sure the kernel modules are loaded
- lsmod |grep kvm
- Should give
- kvm and either kvm_intel or kvm_amd
- kvm should always be there and one of the other two should be there depending on your cpu type. My output was like this:
- kvm_intel 44819 0
- kvm 317840 1 kvm_intel
- Make sure the kernel modules are loaded
- Next you need to make sure to start libvirtd.
- service libvirtd start
- Also make sure it starts at boot
- chkconfig libvirtd on
- Finally you need to get the ISO source of your selected Linux distribution onto your Host. Its probably easiest to just copy it from someplace or download it to the host. In my case since we are geting ready for the Amahi release on Fedora 16 I downloaded the beta DVD to my host. The important thing is to make sure that the ISO is easy to get at. Don't bury it.
You are Ready
Hopefully all that went well. Make sure to reboot if the system update installed a new kernel. Otherwise you should be good to go.
Here is gets a bit complicated again so make sure to follow the steps exactly. But you already know that I'm sure. Most of the work is done for you already with KVM once its installed but as with most software you usually don't want to run with the defaults. After all anybody reading this is definitely a tweaker. Just be careful here because you can blow away everything on this machine. We will be messing with the storage. Specifically we will be adding a "storage pool" to be used by the VM. Obviously we need to set this up before installing the VM.
Storage Pool Concepts
If you have used Vmware or Virtual Box or others you probably are familiar with the VM being stored in a big file. Usually its a vmdk or somthing. While these are fine and work well when using this method you sacrifice some performance because of all the layers being presented to the hypervisor. As a matter of fact the biggest problems with VM perforance can be traced back to how the disk is accessed. Simpler is always better and is almost always more direct. KVM offers direct disk access. In other words it is possible to connect directly to a physical disk in the host to install and run the guest. This offers the best performance because well its the most direct and native way to interact with any block device.
What I will try to describe is a fairly advanced concept called LVM (Logical Volume Manager). There are many methods to create a volume group in Linux but as far as I know it is nessasary to use the KVM gui or cli tools to integrate them properly into KVM. I am not going to describe all the details of LVM because its just so much. Just know that it works well and is very well developed. KVM utilizes LVM and has some built in tools to create and use volume groups. KVM calls them storage pools for some reason, probably to make it easier for people migrating from ESX or others. It makes sense but it can get confusing when all these terms are being tossed around.
Here We Go
Please make sure to follow these steps because you can blow away your system. I have a space PC I am using for this so I am not worried about any data.
- First you have to fire up virt-manager. This is a gui based tool and the following steps will all utilize the gui. There are a ton more options in the cli but we are going to keep in simple here.
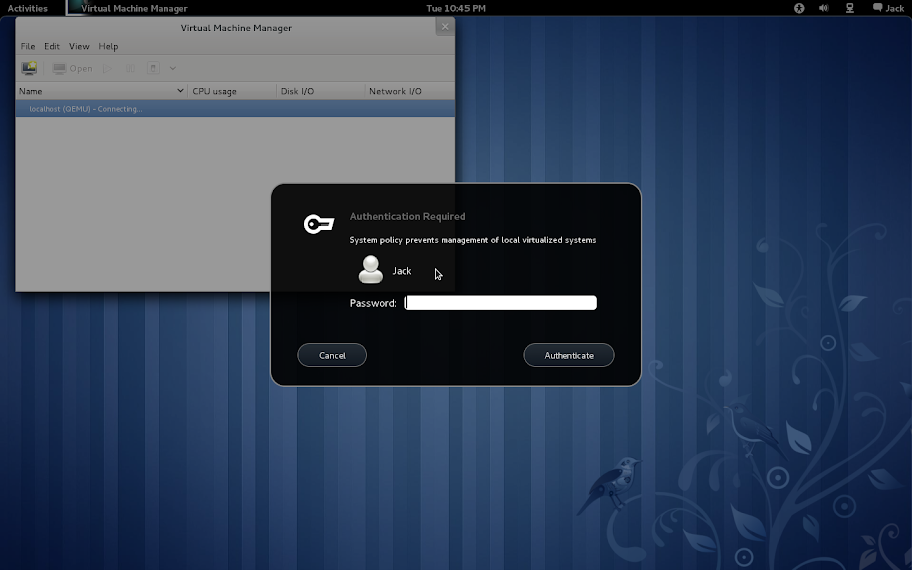
- Start virt-manager from the command line or menu or whatever
- Its going to bug you to authenticate as the root user. You can avoid this by starting virt-manager at the command line as root but anyway
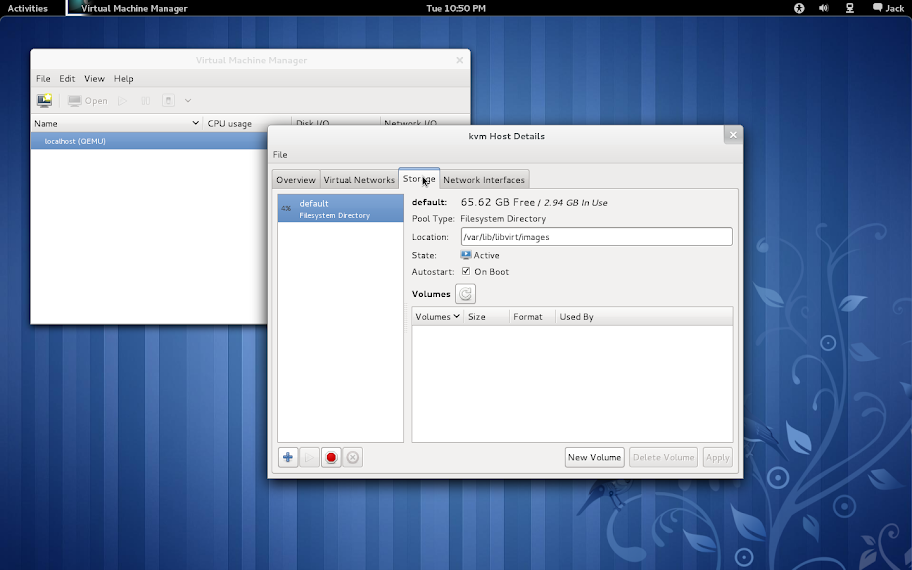
- Once you are in you need to goto Edit --> Connection Details. It should bring up the following overview panel.
- Goto the Storage tab so we can build our storage pool for the KVM VMs.
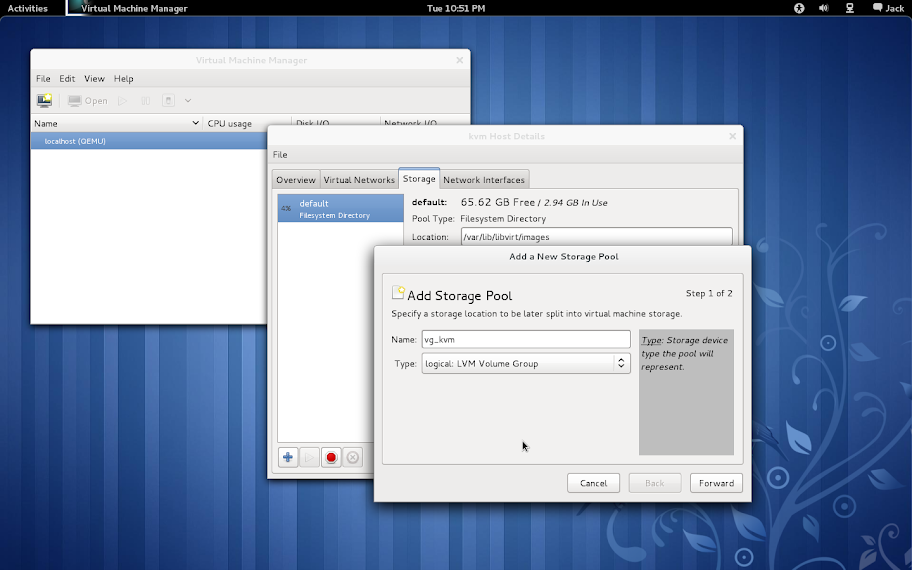
- Once we are there we want to Add a Pool like so
- Image5
- Fill in a name that makes sense to you in the top field. Since this step is creating a volume group I start off with that and then use the underscore and name the volume group.
- In this case we are using LVM so follow along. As you can tell there are many other options including stuff used in the enterprise like iSCSI and others like LVM. You can also choose to just do a file like vmware to keep it simple.
- At this point we are performing the steps of creating a Logical Volume Group. in the bottom left click the plus sign to add a new Volume group. The volume group will store all the logical volumes of the VMs to be created soon. You will also need that drive ID you recorded earlier. You do have that right?
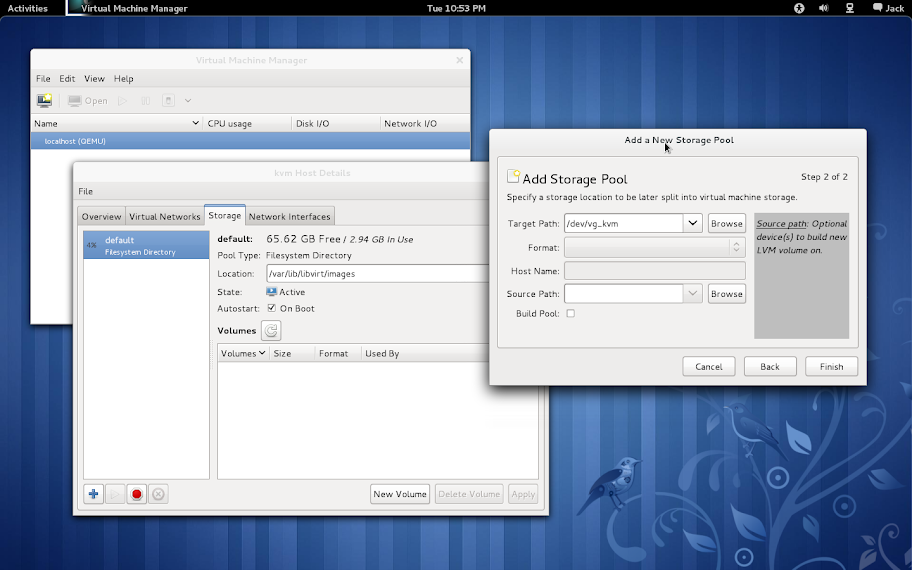
- After hitting the Forward button you will be presented with something like this
- Image7
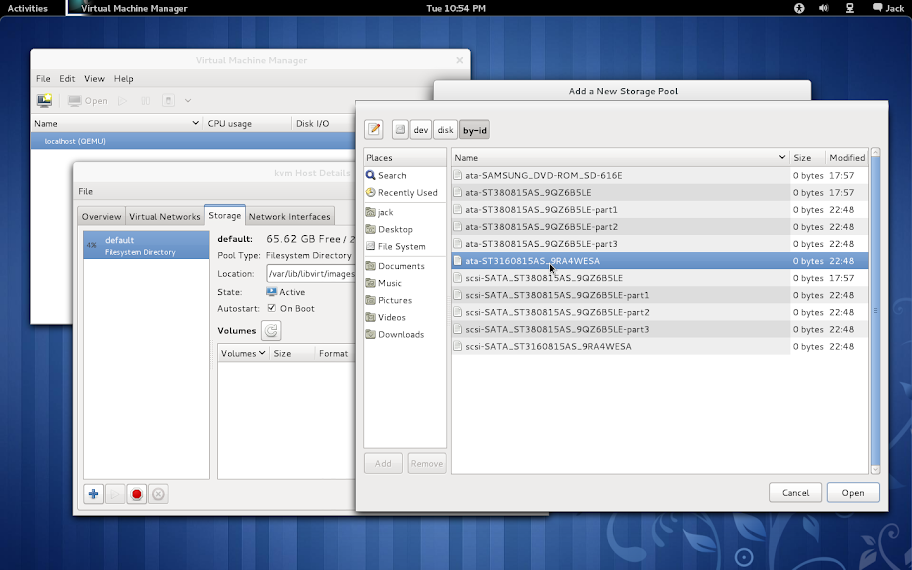
- This is where you need that ID. Hit the browse button by "source path"and navigate to /dev/disk/by-id From there pick the one with the filename that matches your number ID. Don't screw this up or you can blow your host system away!!
- Image8
- Once you pick the correct device you should have this. Check the "build pool" box so the Volume group gets created on the device.
- Here is you final warning.
- At this point our Volume group is created. You can also call this a storage pool. Inside this pool we want to create a new disk or Logical Volume. This will be used to store the VM itself. This will also give the VM direct access to the device just like a non virtualized PC. Select New Volume
- Now give the LV a name. I fall back on my own naming standards which you really need to develop when you do alot of this. Otherwise this field is free form. I name it after the VM that will go on this volume.
- Image11
- Notice the size fields. KVM has the ability to "thin provision" I won't go into too much detail about this. The first field is the ultimate size the volume will be allowed to grow to without an extension. The second field is what will be allocated intially. It will automatically grow to the max field setting over time.
- Once you hit finish you'll have a nice new shiny volume to install whatever you like on it.
- At this point we are ready to install our new VM. You can safely close out the Host Details window and Click the New VM button in the original virt-manager window. Thats the button in the upper left corner of virt-manager. You will be presented with a wizard like interface.
- Image13
- This is where the ISO we copied over earlier comes in handy. Select ISO as the local install media.
- Now just browse to the location where the ISO is located and select your OS type in the dropdowns
- Enter the amount of RAM and number of CPUs you would like for this VM. This is where the 64 bit OS becomes comes in handy. Otherwise your VM would be starved for RAM right off the get go.
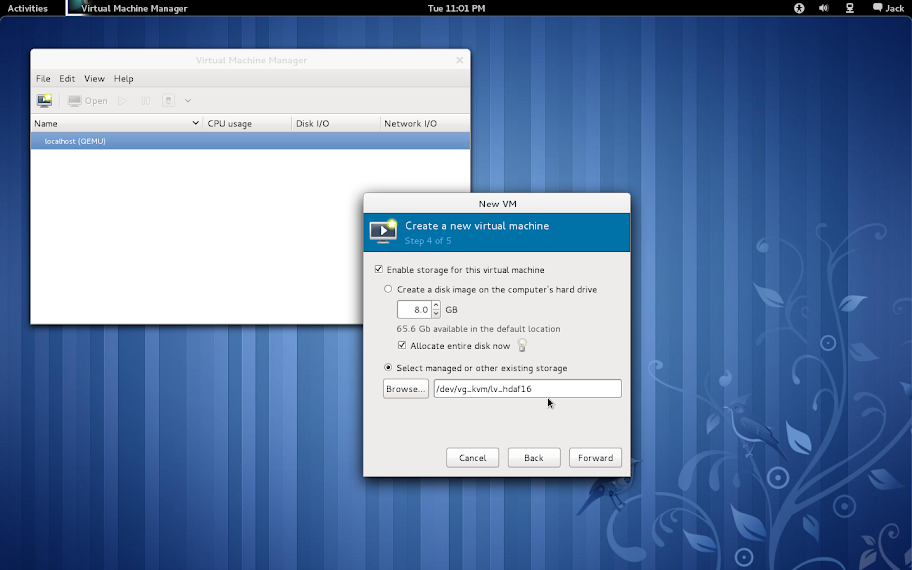
- At this point the VM wizard is asking for a disk to install the VM on. Select the managed storage and hit browse.
- Notice the interface that is very similar to what we used earlier. Select the storage you created earlier and hit Choose Volume at the bottom right corner.
- The selection should look similar to mine
- Now we are almost there check the box "customize configuration before install" also make sure the Architecture is correct. This tends to be wrong so double check the default.
- You will get an overview window. Fill in a description if you like.
- Select the Processor field on the left and open the "Configuration" by clicking the arrow. The hit "Copy Host CPU Configuration"
- Image21
- I am not even sure if this is nessasary but I do it.
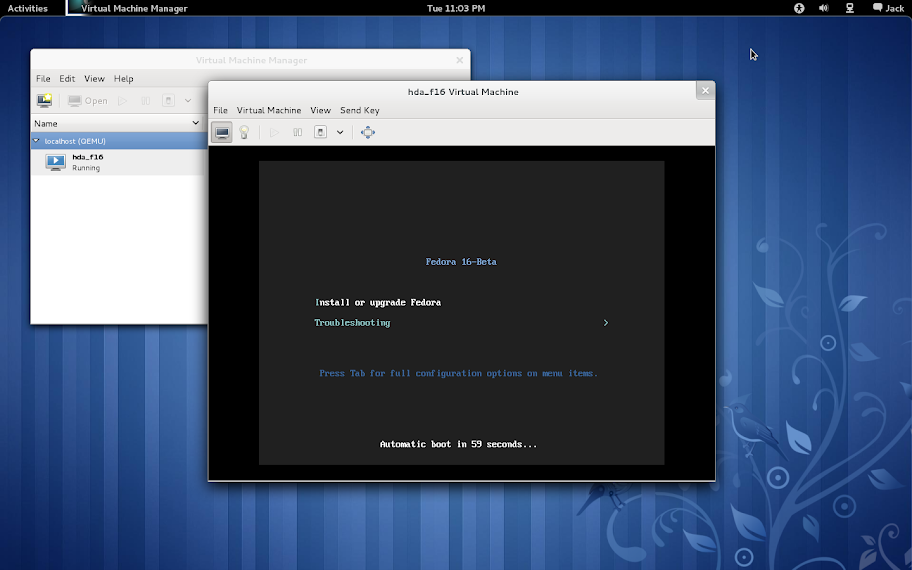
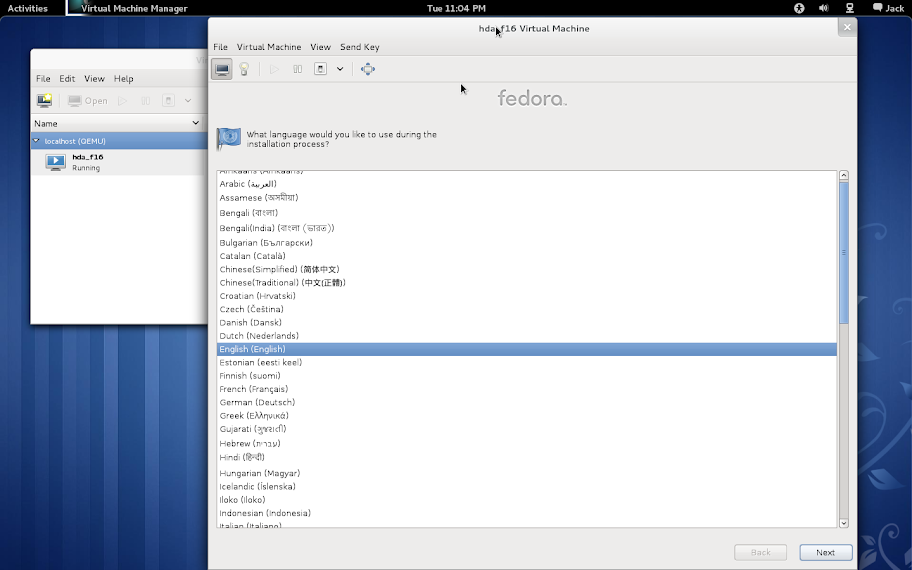
- Hit Begin Install at the top to start the VM installation.
- You should be off and running. Mine booted to the install screen and eventually Anaconda
Problems
Most of the problems I've run into are related to SELinux policy. Depending on your distro of choice you may or may not get these. Since Fedora uses SELinux by default you run a good chance of getting blocked by it. Don't panic. SELinux troubleshooting is pretty good. If you get an alert click the details and it will tell you exactly what to do. Run the commands and you should be good to go. I ran into a few myself but I ironed them out before I ran through this install.
Don't forget to update your VM
First thing to do is to install all the updates to your new VM. This will close any holes that exist.
VM integration
Your VM will be assigned a private network address by KVM. Normally its 192.168.22.X This address will be NATed by default to the network the host is attached to. In my case my host machine called KVM is on my network with my Amahi HDA as well as alot of other devices. I assigned KVM a static address in the Amahi control panel just because its a server. You don't have to if you don't want to. Whats cool is that the VM uses all the network information from the Host. This means that your new VM is effectivly on your network and will resolve all the home devices via the DNS server in Amahi. You can also create an alias in the Amahi networking panel so its possible to reach the VM from anyplace. It rounds things out nicely.
Conclusions
Hopefully you guys get something out of this. KVM is a real alternative to any of the competing virtualization products. I prefer it because its already part of the OS. This is not an immature product. It will work well and "just works" No extra drivers or layers to install. The VM just knows what to do and acts correctly.
I have really just scratched the surface of whats possible. To get an idea as root on the host type in the command "virsh" Then type help. You will get a list of what is possible. Hardware additions, resource addidtions like RAM on the fly can be performed. Snapshots are possible thanks to LVM storage pools. Rollbacks can be performed and lots of things in between. My job as a Linux sysadmin has given me the knowledge to work with most of these things. Hopefully this writeup has passed on some of that knowlege. Its not difficult but you have to do it perfectly. You know its a computer and it does not forgive.
Cheers Jack