Greyhole
Contents
Greyhole
Important warning
What is Greyhole
A new feature in Amahi is Storage pooling using Greyhole.
This feature is installed by default, but requires a few simple steps to begin utilizing the features.
You can add additional drives to your hda and prepare them for use in Greyhole by following this tutorial.
To add a drive to your Greyhole storage pool. First open your dashboard and navigate to the Shares tab. Then click on the Storage Pool sub-category. You will see a page similar to the one below.
For Storage Pool (Partitions)
Select the drives you want available for your storage pool.
Greyhole options
The next step is to select the share you want to replicate across the pool.
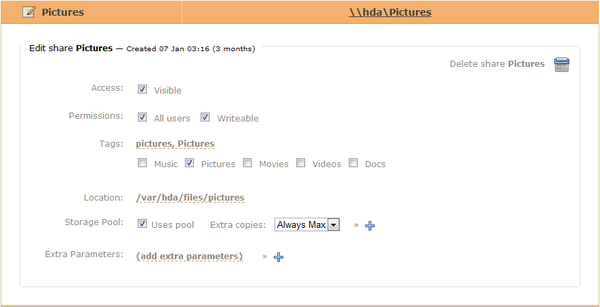
From the Shares tab, select the Shares sub-catagory. We chose the Pictures share for this tutorial.
Check the option for "Uses pool" and choose the number of drives to replicate this share. In this instance we have chosen to use all drives available to the greyhole pool.
Note: Greyhole is not a backup solution. If a file is removed, all copies are removed.
When you start using Greyhole, you might want to copy or move all your exiting files into your new shares that use the storage pool.
Note: This is not necessary if your files are already in Amahi shares. If they are there, and you enable the Uses pool option in the Amahi dashboard, the files will start getting moved around into the drives in your storage pool during the night (starting at midnight), when the nightly storage pool check starts.
The instructions below are for users who have more data to copy into the Greyhole shares than their currently free space in the /var/hda/files/ folder.
Once way to do that is to mount the shares that use the Greyhole storage pool, either on the HDA itself, or on a client computer on your local network, and copy your data from their existing location into the mounted shares. This can be time consuming, but it is the safest way to use Greyhole.
Note that you should never write or modify files directly in the shared directories on the HDA itself, i.e. /var/hda/files/share_name by default. This applies to all shares for which you checked the Uses pool option in the Amahi dashboard.
Another way to move your files from their current location into the storage pool is to share their current location using an Amahi share that Uses pool, then let Greyhole nightly check move the files from there into the pool.
Here's a more detailed walkthrough for this method:
- Setup the Greyhole Storage Pool in the Amahi dashboard, Shares > Storage Pool page.
- Go in the Shares > Shares page. In there, make sure you have an existing share for each share you have data for. Create new ones if you need, remove the ones you don't need.
- Edit the path of each of those shares, and enter the current location of your existing data. For example, the Movies share could have a path = /media/External Drive/Movies
- Enable the Uses pool option for each of your shares, and select the number of extra copies you'd like, if any.
- Now, you either need to wait for Greyhole'S nightly check to start, or you can start it manually from a terminal, as root, using this command: greyhole --fsck
- Monitor /var/log/greyhole.log to see when the fsck operation is done.
- Once fsck is done, your data has now been moved into the Greyhole storage pool (in the drives you selected in Shares > Storage Pool). All that should be left in the previous location of your data (/media/External Drive/Movies from the previous example) should be symbolic links pointing to the new file copies. If the previous location is just empty directories (no symlinks), do not panic. This is normal if your previous location is an NTFS or FAT partition (drive).
- Move all those directories / symlinks from there into the correct folders in /var/hda/files/share_name
- Back in the Amahi dashboard, edit the path of the shares once again, and put back /var/hda/files/share_name (i.e. the folders where you moved the symbolic links).
- If you used an NTFS or FAT partition for the previous location, you'll need another fsck to create the symlinks where they should be. Either wait for midnight, or launch it manually, from a command line, as root: greyhole --fsck
You're done. All your existing data is now stored in the various drives included in your storage pool, and are accessible via the Samba shares you have defined in the Amahi dashboard.


