Difference between revisions of "Greyhole UI App Transition Guide"
| (29 intermediate revisions by 3 users not shown) | |||
| Line 1: | Line 1: | ||
| − | This guide will provide a step by step transition from the manual Greyhole installation to using the [https://www.amahi.org/apps/greyhole-ui Greyhole UI] application for Amahi 7. Going forward, this is the preferred method of installing Greyhole. | + | This guide will provide a step by step transition from the manual Greyhole installation to using the [https://www.amahi.org/apps/greyhole-ui Greyhole UI] application for Amahi 7 or greater. Going forward, this is the preferred method of installing Greyhole. |
| + | |||
| + | == Disclaimer == | ||
| + | While following this guide should not result in any data loss, we cannot guarantee that it won't cause any problems with your HDA. <span style="color:red">'''Please proceed with caution!'''</span> | ||
| − | |||
The [https://www.amahi.org/apps/greyhole-ui Greyhole UI] application does not support previous manual Greyhole installations, meaning all your current Greyhole settings will be overwritten. You will have to reconfigure it using the dashboard. | The [https://www.amahi.org/apps/greyhole-ui Greyhole UI] application does not support previous manual Greyhole installations, meaning all your current Greyhole settings will be overwritten. You will have to reconfigure it using the dashboard. | ||
| − | == Backup | + | '''NOTE:''' If you would still like to setup your Greyhole pool manually, please see [[Amahi_Create_Manual_Greyhole_Setup|Manual Greyhole Setup]]. |
| + | |||
| + | == Backup Settings == | ||
We need to back up or note our current settings prior to installing the application. There are many ways to do this. Lets keep it simple and copy the ''/etc/greyhole.conf file to a share. | We need to back up or note our current settings prior to installing the application. There are many ways to do this. Lets keep it simple and copy the ''/etc/greyhole.conf file to a share. | ||
| Line 18: | Line 22: | ||
Please ensure these are removed before proceeding with the next section. They will be automatically added by the application to each share. but not reflected in the ''Extra Parameters'' field. | Please ensure these are removed before proceeding with the next section. They will be automatically added by the application to each share. but not reflected in the ''Extra Parameters'' field. | ||
| − | :'''NOTE:''' If you are using the [[Mount_Shares_Locally|Mount Shares Locally]] service, recommend you stop it as well. | + | :'''NOTE:''' If you are using the [[Mount_Shares_Locally|Mount Shares Locally]] service, as a precaution recommend you stop it as well. |
service mount_shares_locally stop | service mount_shares_locally stop | ||
| + | |||
| + | == Adding drives == | ||
| + | If you need to add additional drives to your HDA for Greyhole, please follow the [[Adding_a_second_hard_drive_to_your_HDA|adding a second hard drive]] guidance for Amahi 7. The Amahi [https://www.amahi.org/apps/disk-wizard Disk Wizard] application provides a Dashboard UI for this process in Amahi 8 or greater '''ONLY'''. | ||
| + | |||
| + | If you have completed the addition of the drive via disk wizard you then need to add the drive to the storage pool. | ||
| + | Once that has been completed run fsck. | ||
| + | To balance the data among old and new drives you should first run the following command to clean up trash | ||
| + | greyhole -a | ||
| + | |||
| + | Then run this command to balance the drives data. | ||
| + | greyhole -l | ||
== Install Application == | == Install Application == | ||
| Line 27: | Line 42: | ||
== Configure Greyhole == | == Configure Greyhole == | ||
| + | '''NOTE:''' Ensure you have enabled [[Advanced_Settings|Advanced Settings]] before proceeding. | ||
| + | |||
Now that you have the application installed, select the Drive Pooling tab. | Now that you have the application installed, select the Drive Pooling tab. | ||
* <u>Storage Pool</u> | * <u>Storage Pool</u> | ||
:The first thing you will want to do is select the appropriate drives for the storage pool. | :The first thing you will want to do is select the appropriate drives for the storage pool. | ||
| − | [[File:Partitions.PNG| | + | :[[File:Partitions.PNG|350px]] |
:If you are unsure which drives were used, you can open the ''greyhole.conf'' file we saved in our Docs share in any editor and consult your previous configuration. | :If you are unsure which drives were used, you can open the ''greyhole.conf'' file we saved in our Docs share in any editor and consult your previous configuration. | ||
* <u>Shares</u> | * <u>Shares</u> | ||
:Select the share that will use the Storage pool. Don't forget to choose number of file copies. Leave as '''-''' (dash) if none are desired. | :Select the share that will use the Storage pool. Don't forget to choose number of file copies. Leave as '''-''' (dash) if none are desired. | ||
| − | [[File:Shares.PNG|600px]] | + | :[[File:Shares.PNG|600px]] |
:Consult the ''greyhole.conf'' file if needed to see what shares and number of copies were previously used. | :Consult the ''greyhole.conf'' file if needed to see what shares and number of copies were previously used. | ||
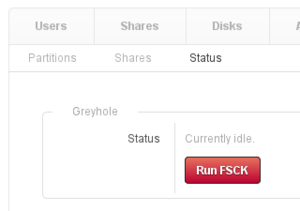
| Line 44: | Line 61: | ||
:[[File:Greyhole_ui_fsck.png|300px]] | :[[File:Greyhole_ui_fsck.png|300px]] | ||
| − | == | + | == Verify Results == |
You can monitor activity as always in the Greyhole log. | You can monitor activity as always in the Greyhole log. | ||
tail -f /var/log/greyhole.log | tail -f /var/log/greyhole.log | ||
| Line 51: | Line 68: | ||
the [[Greyhole_troubleshooting|Greyhole Troubleshooting]] area for assistance. | the [[Greyhole_troubleshooting|Greyhole Troubleshooting]] area for assistance. | ||
| − | :'''NOTE:''' If you stopped [[Mount_Shares_Locally | + | :'''NOTE:''' If you stopped [[Mount_Shares_Locally|Mount Shares Locally]] script earlier, you can now safely start it. |
service mount_shares_locally start | service mount_shares_locally start | ||
== Additional Settings == | == Additional Settings == | ||
There are limited settings configured using the [https://www.amahi.org/apps/greyhole-ui Greyhole UI] application. If you have additional settings you configured manually in the past, see [[Greyhole#Greyhole_Advanced_Options|Greyhole Advanced Options]] for guidance on adding those to Greyhole. | There are limited settings configured using the [https://www.amahi.org/apps/greyhole-ui Greyhole UI] application. If you have additional settings you configured manually in the past, see [[Greyhole#Greyhole_Advanced_Options|Greyhole Advanced Options]] for guidance on adding those to Greyhole. | ||
| + | |||
| + | == Tips and Best Practices == | ||
| + | Refer to [[Greyhole_Tips|Greyhole Tips]] for additional guidance. | ||
== Troubleshooting == | == Troubleshooting == | ||
If you have any problems, please submit a [https://bugs.amahi.org bug report] or stop by the Amahi IRC channel [http://webchat.freenode.net/?channels=amahi #amahi] for real-time assistance. | If you have any problems, please submit a [https://bugs.amahi.org bug report] or stop by the Amahi IRC channel [http://webchat.freenode.net/?channels=amahi #amahi] for real-time assistance. | ||
Latest revision as of 00:54, 10 January 2017
This guide will provide a step by step transition from the manual Greyhole installation to using the Greyhole UI application for Amahi 7 or greater. Going forward, this is the preferred method of installing Greyhole.
Contents
Disclaimer
While following this guide should not result in any data loss, we cannot guarantee that it won't cause any problems with your HDA. Please proceed with caution!
The Greyhole UI application does not support previous manual Greyhole installations, meaning all your current Greyhole settings will be overwritten. You will have to reconfigure it using the dashboard.
NOTE: If you would still like to setup your Greyhole pool manually, please see Manual Greyhole Setup.
Backup Settings
We need to back up or note our current settings prior to installing the application. There are many ways to do this. Lets keep it simple and copy the /etc/greyhole.conf file to a share.
As root user:
cp /etc/greyhole.conf /var/hda/files/docs
Housekeeping
For those who did the manual install, there were two lines manually added to the Extra Parameters field for each share that was Greyhole enabled.
dfree command = /usr/bin/greyhole-dfree
vfs objects = greyhole
Please ensure these are removed before proceeding with the next section. They will be automatically added by the application to each share. but not reflected in the Extra Parameters field.
- NOTE: If you are using the Mount Shares Locally service, as a precaution recommend you stop it as well.
service mount_shares_locally stop
Adding drives
If you need to add additional drives to your HDA for Greyhole, please follow the adding a second hard drive guidance for Amahi 7. The Amahi Disk Wizard application provides a Dashboard UI for this process in Amahi 8 or greater ONLY.
If you have completed the addition of the drive via disk wizard you then need to add the drive to the storage pool. Once that has been completed run fsck. To balance the data among old and new drives you should first run the following command to clean up trash
greyhole -a
Then run this command to balance the drives data.
greyhole -l
Install Application
The Greyhole UI application has a convenience fee, therefore you will need to log in to your Amahi control panel and purchase the application.
Once you have done so, it will appear in your Available Applications list. If it does not, try refreshing the page. Select it and install as you would any Amahi application.
Configure Greyhole
NOTE: Ensure you have enabled Advanced Settings before proceeding.
Now that you have the application installed, select the Drive Pooling tab.
- Storage Pool
- The first thing you will want to do is select the appropriate drives for the storage pool.
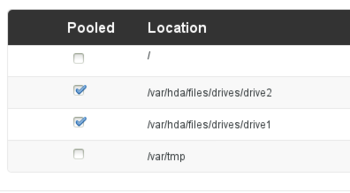
- If you are unsure which drives were used, you can open the greyhole.conf file we saved in our Docs share in any editor and consult your previous configuration.

- Shares
- Select the share that will use the Storage pool. Don't forget to choose number of file copies. Leave as - (dash) if none are desired.
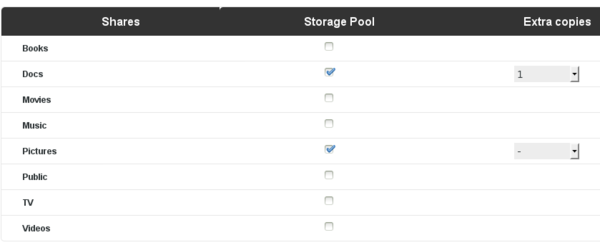
- Consult the greyhole.conf file if needed to see what shares and number of copies were previously used.

- Status
- You will see the status of the Greyhole Daemon.
- If it says 'idle', select Run FSCK

Verify Results
You can monitor activity as always in the Greyhole log.
tail -f /var/log/greyhole.log
Recommend you verify that everything is working properly. If not, refer to the Greyhole Troubleshooting area for assistance.
- NOTE: If you stopped Mount Shares Locally script earlier, you can now safely start it.
service mount_shares_locally start
Additional Settings
There are limited settings configured using the Greyhole UI application. If you have additional settings you configured manually in the past, see Greyhole Advanced Options for guidance on adding those to Greyhole.
Tips and Best Practices
Refer to Greyhole Tips for additional guidance.
Troubleshooting
If you have any problems, please submit a bug report or stop by the Amahi IRC channel #amahi for real-time assistance.