Difference between revisions of "Slideshow"
From Amahi Wiki
| Line 22: | Line 22: | ||
* In the "Export as HTML Page" Window, select your preferred size (800x600 is good enough for typical monitors). | * In the "Export as HTML Page" Window, select your preferred size (800x600 is good enough for typical monitors). | ||
* Click on "Browse..." and navigate to the \\hda\pictures network locationm then click on "Next >" | * Click on "Browse..." and navigate to the \\hda\pictures network locationm then click on "Next >" | ||
| − | [[Image:picasa2.png]] | + | [[Image:picasa2.png|500px]] |
* In the "Select a Web Page Template" window, select "XML Code" and click on "Finish". | * In the "Select a Web Page Template" window, select "XML Code" and click on "Finish". | ||
| − | [[Image:picasa3.png]] | + | [[Image:picasa3.png|500px]] |
Revision as of 07:18, 3 July 2007
Slideshow
Slideshow lets anyone with a browser automatically see the pictures in your HDA picture directory as a slideshow. Simply put picture fo lders in the HDA pictures folder:
\\hda\pictures
Add image folders to \\hda\pictures and invoke Slideshow again to see them!
Exporting Pictures from Picasa
One feature of Slideshow is that it seamlessly supports Google's Picasa picture folders, including captions !
This is how to create Slideshows from Picasa folders:
- In a Picasa picture folder, edit your picture originals and captions as you would normally do
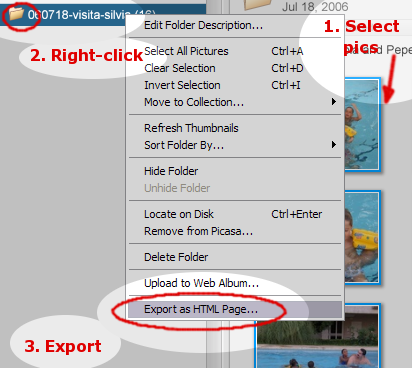
- Select all the pictures in a folder that you want to export (note: it's common to forget selecting pictures.)
- Right-click on the folder you want to export and click on "Export as HTML page ..."

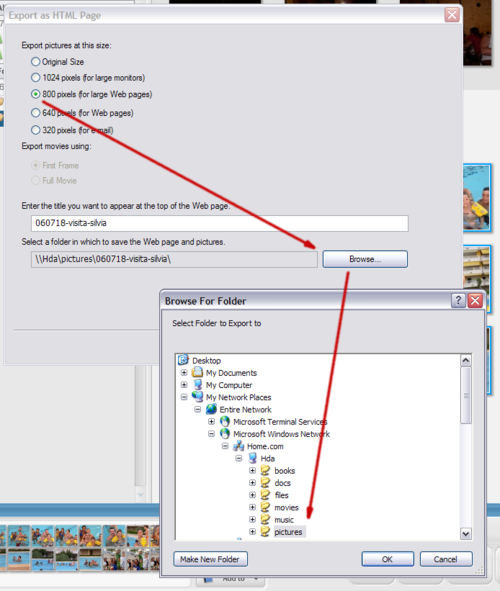
- In the "Export as HTML Page" Window, select your preferred size (800x600 is good enough for typical monitors).
- Click on "Browse..." and navigate to the \\hda\pictures network locationm then click on "Next >"

- In the "Select a Web Page Template" window, select "XML Code" and click on "Finish".

