Amahi in Proxmox with Greyhole
| WARNING | |
|---|---|
| This is recommended only for advanced users, proceed with caution. |
Amahi in Proxmox with Greyhole
This tutorial will skip installation of Proxmox, as that is covered by Proxmox documentation.
The only particular to understand during Proxmox installation is that all drives in the machine at time of install will become part of a LVM group that Proxmox will call "local storage" for images, containers, folders, etc as well as a partition in the LVM for the Proxmox OS itself. Any drives you wish to exclusively use for Greyhole storage pooling would need to be powered-on/ connected after installation of Proxmox. This tutorial is for a setup with Greyhole. This being the case, take note that you will need sufficient storage available in your "local storage" in the Proxmox node (each node is a single hardware server), or have a NFS share or iSCSI share or other LVM group storage for disk images that are not going to be in the Greyhole pool.
Some quick points to cover about using Greyhole drive pooling within this setup..
- It is not advisable to use Greyhole pooling with drive images (instead of physical drives) due to the added overhead and I/O delay that can be introduced. It will slow down your Proxmox machine and your Amahi file server
- This process does work with any Amahi version and installation method, however if Greyhole isn't fully functional with a release of Amahi, it's not advisable to use Greyhole in this case.
- The essential concept when using physical drives through the Proxmox machine is that the drive will NOT be mounted on the Proxmox machine, but routed through QEMU/KVM commands to the VM that will use it, much like a hardware pass-thru.
- When the physical drive is added to the VM, it will show up in the Proxmox web GUI, but should NOT be tampered with from there.
- Use the "Notes" field for your Amahi VM in the Proxmox web GUI to write in and track the usage, mount points and drives and even SATA port numbers so as to avoid confusion. You want to be well in control of what volumes are doing what work so as to not accidentally disconnect or destroy your drives/data.
OK, warnings and notices done... Onward!
Before we begin, make sure you can run the web GUI in your browser, and you have the latest version of JAVA installed in your browser, as the console views rely on it.
We will begin with setting up the Amahi VM inside the web GUI, which is accessible via the default IP
x.x.x.4:8006 (where x is the first 3 octets of your network)
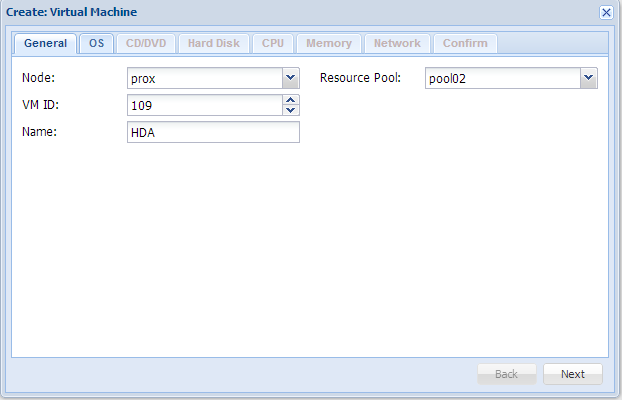
- Click on "Create VM" at the top right corner
-
Choose the node, VM number (defaults to the next available), name (anything you like such as 'HDA', or 'Amahi'), and the resource pool to fall under (will need to be defined beforehand) (resource pool is just a pseudo-logical way of looking at stats for several VMs) .. then click "Next"
- Choose the Linux 2.6/3.x kernel type .. then click "Next"
-
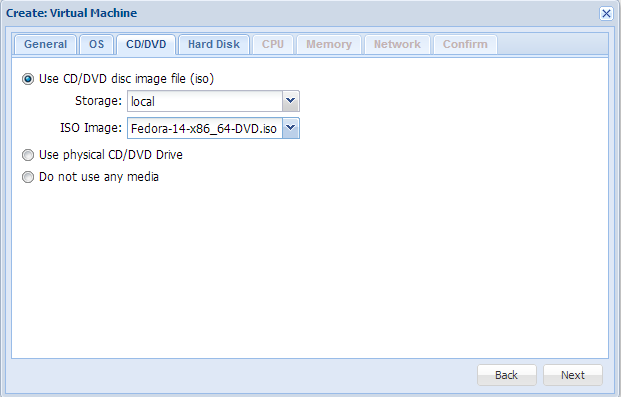
Choose the "Use CD/DVD disc image file (iso)" option. Then find the storage area (usually 'local') where your Fedora or Ubuntu ISO resides .. then click "Next"
-
In the Hard disk tab, you have several options.
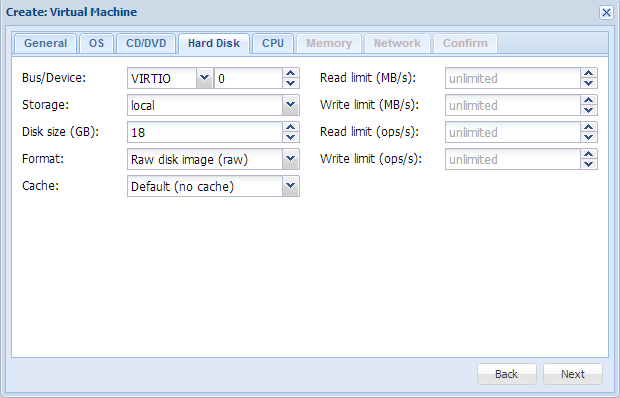
- Start with VIRTIO. This is a abstracted, optimized interface for drive images. As this is the first disk, it will be device '0'.
- Choose the storage volume that will contain this image; typically the "local" unless you have setup something else.
- Choose the disk size in gigabytes. As this is the first disc, unless you have particular needs, 16-20GB is sufficient as this will only be holding your Fedora/Ubuntu OS drive contents (/, /home, swap).
- Choose the format of the image. This is up to you as there are pros/cons for the options. Suggest to google the types to see what works best for you. "Raw" amd "qcow2' both have similar compatibilities.
- leave the cache option at "Default (no cache)"
- read and write limits are up to you, but are best left at unlimited unless you've previous experience with such limitations
- .. then click "Next" -
The following tab is for CPU options
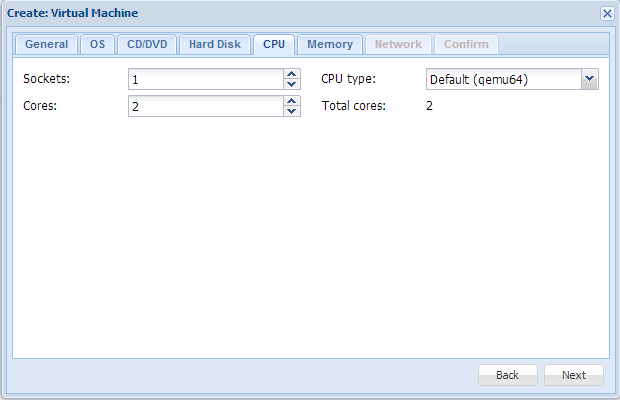
This tab decides how much CPU to give to your Amahi VM. Choose options that meet or exceed the minimum system requirements for your chosen OS (Fedora/ Ubuntu).
- start with 2 core and 1 socket and a 'qemu64' CPU type. You can always go back and change it.
- .. then click "Next" -
The memory tab decides the amount of system RAM you give the VM. This is also your own choice, depending on what you want to be able to do with your Amahi VM. Settomg 1GB (1024MB) is sufficient. You can always go back and change it.
- .. then click "Next" -
This next network tab decides what kind of networking to give the VM.
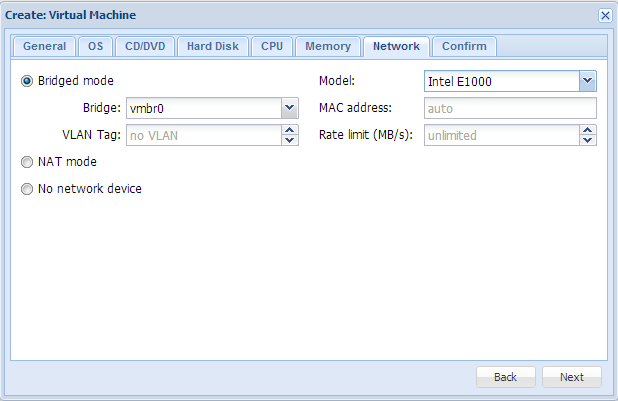
- go for "bridged mode" as we want the VM to look like a real device on the LAN
- the default bridge is always vmbr0 and it also shares traffic with the web GUI console. If you have no additional NICs in the physical machine, this will be the only bridge to use.
- the model option yields tiny differences in results.
'Intel E1000' tends to be the most compatible for a server.
You may of course try with any of these, keeping in mind that the Fedora or Ubuntu OS may rename the interface after such a change (Amahi depends on seeing 'eth0' as of Amahi6/ Fedora14)
- setting a MAC address is auto by default and rate limit is also unlimited by default. You may change these as you see fit.
- .. then click "Next" -
The final tab will show you a confirmation of the settings you made. Go back and make changes if need be.
Once ready and happy, click "Finish" and the VM will be created.
The VM is ready when you see it in the left side column of the main GUI, under the 'Server' view, with your Proxmox node expanded. -
In its current state, your new VM is off, and also NOT set to start automatically when the Proxmox node boots up. This setting can be changed later, as you see fit.
Congrats! you've created the virtual machine that your HDA will use. - To accommodate the Greyhole Landing Zone volume on this VM, add a single drive image to the VM to act as the LZ storage mount, typically known to Amahi users as '/var/hda/files'.
- Under the 'hardware' tab, click "add" > "hard disk" > 'VIRTIO' > device '1' > storage 'local'
- Decide how big this drive is to be. It is limited only by how much 'local' storage is available in that Proxmox partition. A good suggestion is 500MB to 1TB because the LZ needs to be big enough to handle your data moving into the storage pool. Once again the remaining options are up to you, but leave cache at 'default'. I would suggest to NOT include this LZ drive image in backups and snapshots (There's no need to back this up unless you will have shares NOT marked for pooling) Finally, click "Add" and this drive is added to the VM -
At this point, with the HDA VM highlighted, click the "Start" button at the top right of the window and it will boot up. Right away, click the "console" button just to the right of the migrate button.
This will launch a window which will be the display for the VM. You will see a normal boot that will boot from the ISO you selected earlier. - During installation, setup the second drive you added to mount '/var/hda/files', thus creating your Landing Zone partition right away at install of Fedora/Ubuntu.
-
Installation at this time is just the same as documented by the OS and in the Amahi installation procedures. Please refer to those until your next boot.
** Remeber to remove the ISO from the virtual CDROM drive when required, by selecting the VM in the list and going to: "hardware" tab > select "CD/DVDROM drive" > click "Edit" > select "Do Not Use Any Media" -
After OS installation is complete. You may turn on the auto-boot and even select the order in which this VM boots around other VMs in Proxmox.
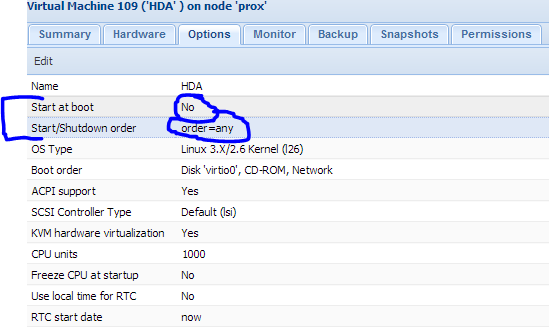
*It is suggested that if your HDA is definitely going to be your DNS and DHCP server, that it boots as '0' (first).
- Now that your Amahi VM is installed and created, please check that its main functionality is good. Your OS drive and the second drive acting as LZ, mounted to '/var/hda/files' should be accessible. If all is well, shut down the VM.
At this point in time, your physical drives that you wish to use with Greyhole should be inside the Proxmox node and connected. If they are not, please shut down the system, connect the drives, boot it up and then ensure your Amahi VM is shutdown once more.
Now use any method you wish to get terminal access to your Proxmox node: either with the 'Console' button in the web GUI, or your favourite SSH client to SSH the Proxmox node. -
This step is where you finally point the physical drive to the VM, through the Proxmox console.
This command will add a IDE "abstracted" device to VM101:qm set vm101 -ide0 /dev/sdb
- vm101 is the ID of the virtual machine to which you want to point the drive.
- ide0 identifies the drive once mounted, as ide0 and the protocol for it
- /dev/sdb is the installed but not mounted in Proxmox drive in the hardware system.
Once booting this KVM, now add this drive by manually, permanently mounting it to the VM. This could be via editing the /etc/fstab within the VM or using any other drive mounting tool/method you wish. You should reference the Amahi drive-adding wiki article at this point to ensure the drive is added appropriately:
For each physical drive you add, you can decide to pool it to Greyhole or not. It helps to understand some commands for managing drives and volumes and partitions in Linux before doing too much moving around.
Adding a Second Drive to your HDA


NOTE: Greyhole drives or drive images with data on them can be added to a newly installed Amahi VM and if mapped identically as before, they should function fine once the greyhole -f
command has run through a couple times.
Do reference Post Install Hardware Changes for swapping hardware, which is similar to changing from a physical to virtual setup.