Upgrading ownCloud to New Version Releases
NOTE: With the introduction of Nextcloud it has not been determined how version release numbering will be managed.
Starting from the ownCloud 8.0 release, new releases are issued in a "time based" schedule. Please be aware due to testing and software changes a schedule can be changed suddenly.
New versions have a specific numbering format: x.y.z
- x - each year there will be a new release (i.e. 7, 8, 9). This is an upgrade.
- y - every calendar quarter there will be a new major version (i.e. 8.0 8.1, 8.2), starting at 0 for quarter one. This is an upgrade.
- z - patch and security intermediate releases are issued as necessary (i.e. 8.1.1, 8.1.2), also known as "point releases". This is an update.
Refer to the Nextcloud Maintenance and Release Schedule for more information.
Contents
The following sections are meant for sites with small to medium installations. If for some reason an update/upgrade fails chances are it will be due to a "PHP timeout" or a software flaw in the ownCloud updater process. "PHP timeouts" can occur on larger installations, refer to the Nextcloud documentation regarding the use of the "occ" command-line facility (it works well for small to medium installations as well. Should the update/upgrade process (this happens from time-to-time) fail due to a software flaw consult the Nextcloud Forum for possible workarounds or wait a new release of Nextcloud.
Updating ownCloud/Nextcloud on Amahi
Use the following steps for updating:
- Catalog all applications active in the current ownCloud instance. Take special care to identify the "core" applications that were activated and Approved/Experimental applications that were installed. There is no guarantee that non-core applications will work on a new ownCloud release.
- Review and document all ownCloud sharing techniques used in the current ownCloud instance.
- It is recommended that all non-core applications be disabled before updating.
- Do backups of the ownCloud database, binaries and stored files.
- Go to the Amahi Dashboard, Apps => Installed, and uninstall the current ownCloud instance. This will remove the ownCloud binaries and ownCloud database.
- Go to the Amahi Dashboard, Apps => Available, and install the new ownCloud release.
- Using a "terminal" connection, "cd" in to the ownCloud directory containing the binaries.
cd /var/hda/web-apps/owncloudx/html
   - where "x" is an ownCloud major release number
- Restore the ownCloud "config.php" file from backups.
- Restore the ownCloud apps directory from backups.
- Using a "terminal" connection and using the command-line OR an Amahi MySQL application restore the ownCloud database from backups.
- Using a web browser, open ownCloud and something similar will display:
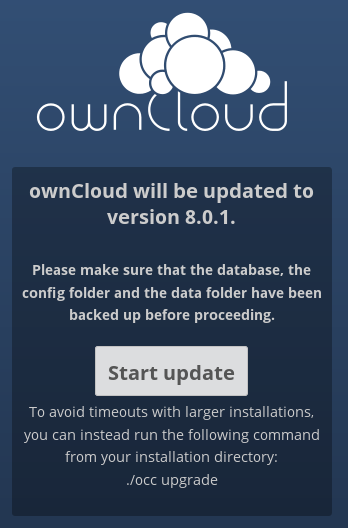
- This is the ownCloud "updater" process, it will do attempt to do the final update steps to the new ownCloud instance. When completed it should redirect to the ownCloud login screen. If there are any errors, consult the ownCloud Administrator's guide and possibly the ownCloud Forum.

- If the update was successful, login to the ownCloud "administration" user account as usual.
- Navigate to the ownCloud Admin page and confirm the new version release number.
- Confirm some of the other settings and make appropriate changes (file upload/download sizes, versioning).
- DO NOT turn the system over to users yet!
- Enable required "core" and Approved/Experimental applications "one-at-a-time", testing each application. Stop at any behaviour that is not the same, this usually happens with Approved/Experimental applications (there maybe new versions that have to be installed).
- Login to a normal user account and test ownCloud functionality (i.e. sharing) and applications.
- If the prior testing was successful have other users test their ownCloud IDs.
- The update is now completed.
Upgrading ownCloud/Nextcloud on Amahi
Use the following steps for upgrading:
- It is highly desirable that your current ownCloud instance is at the latest release number (nothing below release 8.0.0 will upgrade) before the next major version release. This is important as there may have been some important meta data fixes (or other fixes) that the new major release is dependent on. If you skip this step the upgrade for ownCloud may have some problems at a future time. The following sub-steps use an upgrade from ownCloud 8.0.7 to 8.1.1 as an example.
- Catalog all applications active in the current ownCloud instance. Take special care to identify the "core" applications that were activated and Approved/Experimental applications that were installed. There is no guarantee that non-core applications will work on a new ownCloud release.
- Review and document all ownCloud sharing techniques used in the current ownCloud instance.
- Do backups of the ownCloud database, binaries and stored files.
- Go to the Amahi Dashboard, Apps => Installed, and uninstall the current ownCloud instance. This will remove the ownCloud binaries and ownCloud database.
- Go to the Amahi Dashboard, Apps => Available, and install the new ownCloud release.
- The following sub-steps must be done for ownCloud releases from version 8.0 and beyond. Refer to the "ownCloud 8.0 and Future Updates/Upgrades on Amahi" section on this page for more information.
- Using a "terminal" connection, "cd" in to the ownCloud directory containing the binaries.
cd /var/hda/web-apps/owncloudx/html
  - where "x" is an ownCloud major release number
- Restore the ownCloud "config.php" file from backups. Remember that this restore should be from the last major point release (i.e. 8.0.7) versus the new major release (i.e. 8.1.1) that will be the upgrade (not update). DO NOT restore the ownCloud applications as many may not be compatible with the new release.
- Navigate to the ownCloud "config" directory:
cd /var/hda/web-apps/owncloud8/html/config/
- The restored "config" directory contains a file, "config.php" as follows:
   $CONFIG = array (
    'instanceid' => 'xxx',
    'passwordsalt' => 'xxxx',
    'datadirectory' => '/var/hda/files/owncloud8/data',
    'dbtype' => 'mysql',
    'version' => '8.0.7',
    'dbname' => 'owncloud8',
    'dbhost' => 'localhost',
    'dbtableprefix' => 'oc_',
    'dbuser' => 'owncloud8',
    'dbpassword' => 'owncloud8',
    'installed' => true,
    'theme' => ,
    'maintenance' => false,
   );
NOTE:
The following old example shows a major release change from 6 to 7.
When required, say an upgrade from 6 to 7, references with "owncloud6" in this file must be changed to "owncloud7". DO NOT change the "version". The changes can be made with a text editor or the following handy Linux command. The command looks through the "restored" config.php file in the new ownCloud 7 upgrade instance, for occurrences of owncloud6 and changes them to owncloud7.
sed -i 's/owncloud6/owncloud7/g' /var/hda/web-apps/owncloud7/html/config/config.php
- The "config.php" would have been changed as follows:
   $CONFIG = array (
    'instanceid' => 'xxx',
    'passwordsalt' => 'xxxx',
    'datadirectory' => '/var/hda/files/owncloud7/data',
    'dbtype' => 'mysql',
    'version' => '6.0.6.1',
    'dbname' => 'owncloud7',
    'dbhost' => 'localhost',
    'dbtableprefix' => 'oc_',
    'dbuser' => 'owncloud7',
    'dbpassword' => 'owncloud7',
    'installed' => true,
    'theme' => ,
    'maintenance' => false,
   );
- Using a "terminal" connection and using the command-line OR an Amahi MySQL application, restore the ownCloud database from backups.
- Using an Internet Browser navigate to ownCloud, the upgrade will now begin,something similar will display:
- This is the ownCloud "updater" process, it will do attempt to do the final update steps to the new ownCloud instance. When completed it should redirect to the ownCloud login screen. If there are any errors, consult the ownCloud Administrator's guide and possibly the ownCloud Forum.
- If the upgrade was successful, login to the ownCloud "administration" user account as usual.
- Navigate to the Admin page and confirm new version release number.
- Confirm some of the other settings and make appropriate changes (file upload/download sizes, versioning).
- DO NOT turn the system over to users yet!
- Navigate to the Apps page.
- Enable "core" applications that were used in the previous ownCloud instance "one-at-time". Testing each after enabling.
- Enable/Install any additional Approved/Experimental applications available from the new release that were used in the prior ownCloud instance. Testing each after enabling.
- Login to a normal user account and test ownCloud functionality (i.e. sharing) and applications.
- If the prior testing was successful have other users test their ownCloud IDs.
- The upgrade is now completed.
ownCloud 8.0/Nextcloud and Future Updates/Upgrades on Amahi
In order to allow multiple instances of different version releases of ownCloud on the same Amahi server naming changes to the main ownCloud application directory and database names have been implemented.
- The location where the actual ownCloud application is stored has changed to "/var/hda/web-apps/owncloudx/html" (where "x" is the major release number). For example for ownCloud release version 7.0.3 the directory is named owncloud7.
- The ownCloud database user ID, password, and name have changed in the same manner. Before updating or upgrading changes will have to be made to the ownCloud "config.php" configuration file before proceeding further.
- You may want to consider changing your ownCloud data file directory name for the same naming convention. Provided you used the name owncloud as part of the data directory name.
- If you use automated backup and recovery software you may have to reload and reconfigure your ownCloud data and backup system configuration before the next backup set is taken. Some backup systems allow you to change the ownCloud directory names (data, ownCloud config,php location) in the existing backup sets (rsnapshot).
- Starting with ownCloud 8.0, on upgrade, most applications are disabled, only certain "core" applications are left enabled (Files, Pictures). The ownCloud Community has "slimmed" down their installation package to provide basic functionality. Most "core" applications have now been moved to the ownCloud appStore.
Upgrading ownCloud 8.2.1 to Nextcloud 10.x on Amahi
About June 1, 2016 one of the founders, some developers, and some staff broke away from the ownCloud organization. The result was the creation of a "fork" product based on ownCloud 9, called "Nextcloud". Nextcloud 9 was introduced as a "plug-in" replacement for ownCloud 9. However, due to severe bugs inherited from ownCloud the update/upgrade process did not function correctly. Later releases of Nextcloud 9.0.54 and 10.0.1 repaired the process. Unfortunately due to the broken process many Amahi users are still using earlier stable releases of ownCloud. Implementing Nextcloud would have resulted in users starting from scratch with new installations. This is a problem for instances that have big collections of stored data and sharing configurations. Amahi has decided to go straight to Nextcloud 10.0.1. So the question, can we skip a major upgrade step (Nextcloud 9.0.54)? Well, kind of, with some issues, it is possible. This section will help you with that.
The supported upgrade path should be for example; ownCloud 8.2.1 => Nextcloud 9.0.54 => Nextcloud 10.0.1. This works flawlessly. The steps that follow are not not guaranteed to work for every new upgrade instance of Nextcloud 10. ownCloud 8.2.1 is the earliest release tested. If the upgrade steps do not work for a new upgrade instance you will have to start with a complete new installation. The Nextcloud Community will not help with issues where an upgrade step was skipped.
NOTE: The section for Backup and Recovery of ownCloud/Nextcloud has been updated, please read carefully!
- Backup the ownCloud 8.2.1 (not guaranteed to work for anything earlier) instance to be upgrade, including the database.
- Rename the old owncloud code directory in “/var/www/html/”, to say “xowncloud”.
- Download and extract “Nextcloud 10.0.x” to a "Downloads" or other known location.
- Rename the “nextcloud” binaries directory to “owncloud”.
- Copy the downloaded binaries (owncloud) directory over to the "/var/www/html/" location.
- Go to the copied "owncloud" directory under /var/www/html/, find PHP files; "version.php" and "index.php". Copy them to a known location, they will be required downstream in the upgrade.
- In “owncloud” directory, in the “version.php” file.
- Find the line containing "$OC_VersionCanBeUpgradedFrom".
- Change the entry to: $OC_VersionCanBeUpgradedFrom = array(8,2,1); <== DO NOT TRY THIS FOR VERSIONS PRIOR TO V8.2.1, IT MOST LIKELY WILL FAIL.
- Drop and create the database instance.
- Perform the usual recommended upgrade steps (from backups??):
- Restore the old "config.php".
- Restore the database.
- Set permissions and ownership to binaries directory structure.
- Now do the usual upgrade process (i.e. via the browser GUI). The upgrade "should" complete successfully. DO NOT login to Nextcloud yet.
- Copy the original “index.php” and “version.php” files from the "known" location in to the “owncloud” directory, replacing the existing copies (this will overwrite the modified version.php).
- After the copying of the PHP files, restart the Apache or reboot the server.
- Login to Nextcloud as the “administration user” and go to the “Admin” application. A scanning operation will begin in the “Security & setup warnings” section.
- After a period of time a warning message will appear in “red” stating that a “Code Integrity check...” failure has occurred.
- On the red line for this failure, "click" on the "Rescan" link. This will force a new Nextcloud scan. After the new scan the code check failure should disappear.
- Test the new instance. On the surface most things will upgrade correctly.
- Sharing and data configurations tested worked "mostly".
- Some applications may not upgrade correctly, usually disabling/enabling each application should fix the issue.
- If using “External Storage Support”, there maybe a double entry for the same items. Delete the second one.