Difference between revisions of "GettingStarted"
| (10 intermediate revisions by 2 users not shown) | |||
| Line 1: | Line 1: | ||
| + | {{NeedsUpdate}} | ||
OK. You've just finished installing your Amahi Home Server and rebooted it (we call it an HDA - Home Digital Assistant for short). Now what do you do? | OK. You've just finished installing your Amahi Home Server and rebooted it (we call it an HDA - Home Digital Assistant for short). Now what do you do? | ||
| − | Well, the first thing is to connect to your HDA from a computer on your network. Simply enter '''hda''' (http://hda) in the URL for your browser and you'll find yourself looking at your HDA home page. | + | Well, the first thing is to connect to your HDA from a computer on your network. Simply enter '''hda''' (http://hda) in the URL for your browser and you'll find yourself looking at your HDA home page. (you ''may'' need to refresh your network settings since your HDA is now managing your network). |
[[Image:Hda_start.gif|HDA startup page]] | [[Image:Hda_start.gif|HDA startup page]] | ||
| Line 11: | Line 12: | ||
==Create A User== | ==Create A User== | ||
To create a user | To create a user | ||
| − | # use the setup link | + | # use the setup link |
# select the Users tab | # select the Users tab | ||
# press the "New User" button | # press the "New User" button | ||
| Line 18: | Line 19: | ||
==Create A Share== | ==Create A Share== | ||
To create a share | To create a share | ||
| − | # use the setup link | + | # use the setup link |
# select the Shares tab | # select the Shares tab | ||
# press the "New Share" button | # press the "New Share" button | ||
# enter information for the share and press the "Create button" | # enter information for the share and press the "Create button" | ||
| + | |||
Once a share is created you can specify more details about it. | Once a share is created you can specify more details about it. | ||
| Line 32: | Line 34: | ||
Return to http://hda where you will find links to | Return to http://hda where you will find links to | ||
| − | * Setup - where you can setup your HDA | + | * [[Setup]] - where you can setup your HDA |
| − | * My Apps - install/uninstall additional [[ | + | * My Apps - install/uninstall additional apps |
| − | + | * [[Calendars]] - shared calendars for everyone in your house | |
| − | + | ||
Of course there are a whole lot of other things you can do with your HDA (like use the [[VPN]] to have secure remote access, publish multiple calendars, etc). | Of course there are a whole lot of other things you can do with your HDA (like use the [[VPN]] to have secure remote access, publish multiple calendars, etc). | ||
Latest revision as of 01:10, 11 May 2017
| Update Needed | |
|---|---|
| The contents of this page have become outdated or irrelevant. Please consider updating it. |
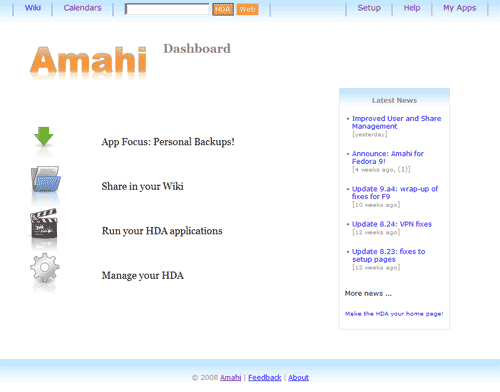
OK. You've just finished installing your Amahi Home Server and rebooted it (we call it an HDA - Home Digital Assistant for short). Now what do you do?
Well, the first thing is to connect to your HDA from a computer on your network. Simply enter hda (http://hda) in the URL for your browser and you'll find yourself looking at your HDA home page. (you may need to refresh your network settings since your HDA is now managing your network).
To get going we recommend the first things you do are:
- Create a user to access shares
- Create a share for storing/sharing files in your network
Create A User
To create a user
- use the setup link
- select the Users tab
- press the "New User" button
- enter information for the user and press the "Create button"
To create a share
- use the setup link
- select the Shares tab
- press the "New Share" button
- enter information for the share and press the "Create button"
Once a share is created you can specify more details about it.
Click on the Share you just created and you can specify
- whether it is visible to users on your network
- which specific users can access (read) or write to the share
- what sort of information will be stored in the share
Doing More with Your HDA
Return to http://hda where you will find links to
- Setup - where you can setup your HDA
- My Apps - install/uninstall additional apps
- Calendars - shared calendars for everyone in your house
Of course there are a whole lot of other things you can do with your HDA (like use the VPN to have secure remote access, publish multiple calendars, etc).

