Difference between revisions of "VPNAndroid"
Beaker2382 (talk | contribs) |
|||
| (15 intermediate revisions by 7 users not shown) | |||
| Line 1: | Line 1: | ||
| + | {{NeedsUpdate}} | ||
| + | <!--Tested with Nexus 6 on 5.1.1 working however instructions need bringing upto date--> | ||
| + | |||
| + | =OpenVPN for Android Client Configuration= | ||
| + | This wiki has been updated for use with OpenVPN for Android v0.6.73 without Android Root access. Older versions of the wiki are maintained below. | ||
| + | |||
| + | It is presumed that you have installed the [http://www.amahi.org/apps/openvpn OpenVPN] server app on your HDA and [https://wiki.amahi.org/index.php/OpenVPN configured] it properly. | ||
| + | |||
| + | # Download the (3) certificate files. They can be found on the [[OpenVPN Client Certificates]] download page. | ||
| + | ##If downloading from link above directly to Android Device, Google translate may ask if you wish to translate the document, DO NOT allow any translation to occur. | ||
| + | ##If downloading to a computer first, the key is often downloaded as xxx.key.txt. You must remove the .txt extension. | ||
| + | # Launch the OpenVPN app, select Add Profile (+), give it a name and it will bring you to the Basic configuration tab <br />[[File:NoVPNDefined.png | 180px]][[File:AddProfile.png | 180px]] | ||
| + | # In the Basic tab, Select "User/PW + Certificates" from the pull down menu of Types <br />[[File:TypeAndCerts.png | 180px]] | ||
| + | # In turn, select the CA Certificate, Client Certificate and Client Key files that you downloaded to your device <br />[[File:CertsAdded.png | 180px]] | ||
| + | # Username refers to a configured User of the Amahi server you are trying to connect to. Leave password field empty to be prompted to enter a password every time. | ||
| + | #Swipe left or right to change tabs in the Configuration page or select them directly from the tab bar. | ||
| + | #From the Server List tab, enter your server Dynamic DNS name found on the [http://www.amahi.org Control Panel] - xxx.yourhda.com <br />[[File:serverDNSname.png | 180px]] | ||
| + | #From the Authentication/Encryption tab, select Remote Certificate Subject and look closely for the pull down arrow in the open window, select RDN Prefix <br />[[File:SubjectPulldown.png | 180px]] | ||
| + | #In the Remote Certificate Subject box change the data field to read Amahi-Server-OpenVPN <br />[[File:HostnameSubject.png | 180px]] | ||
| + | #Configuration is complete, hit the android device's back button to return to the OpenVPN main screen. This will show your new profile, and if you are NOT connected to your local network (turn off Wi-Fi and use cellular data), you will be able to select your profile and it will connect. A secure connection will be shown as a key symbol next to the cellular signal strength bar. | ||
| + | |||
| + | |||
| + | <br /> | ||
| + | |||
= VPN Client - Android - HTC Android G1/Dream = | = VPN Client - Android - HTC Android G1/Dream = | ||
| + | |||
| + | '''NOTE:''' [https://play.google.com/store/apps/details?id=de.blinkt.openvpn&hl=en OpenVPN for Android] works with the certificates below for ICS 4.0 or greater without rooting your device. There is no additional configuration required to the HDA or your device (Tested on HTC One X and Samsung Tab 2 also on HTC One V). For Sony Xperia ZR (and I suspect most other Android devices) the following was necessary: | ||
| + | |||
| + | # Download the certificates. They can be found on the [[OpenVPN Client Certificates]] download page. | ||
| + | # Launch the OpenVPN app, Add Profile and go to the Basic configuration page<br />[[File:OpenVPNAndroid-1-AddProfile.png|180px]] [[File:OpenVPNAndroid-2-ChooseBasic.png|180px]] | ||
| + | # Enter your server address - the Dynamic DNS name works for me, I guess the fixed IP address would as well<br />[[File:OpenVPNAndroid-3-EnterServerAddress.png|180px]] | ||
| + | # Select "User/PW + Certificates" from the list of Types (the certificates alone are not enough)<br />[[File:OpenVPNAndroid-4-SelectType.png|180px]] [[File:OpenVPNAndroid-5-SelectedType.png|180px]] | ||
| + | # In turn, select the CA Certificate, Client Certificate and Client Key files that you downloaded to your device; note that the app will disable the file type it doesn't think will work so beware if you rename these files<br />[[File:OpenVPNAndroid-6-SelectCertKey.png|180px]] | ||
| + | # Enter your username - a general user with access to the shares and apps on your HDA<br />[[File:OpenVPNAndroid-7-EnterUsername.png|180px]] | ||
| + | # Go back to the list of profiles and click on this new profile to start connecting to your HDA: you will be alerted to the fact that OpenVPN for Android can intercept network traffic and asked to trust the application (ensure that your device is not already connected to the same network - test from a different location or turn of wifi and use your mobile data connection)<br />[[File:OpenVPNAndroid-8-TrustApplication.png|180px]] | ||
| + | # Enter your password - you can decide whether or not the application should save the password<br />[[File:OpenVPNAndroid-9-EnterPassword.png|180px]] | ||
| + | # Watch for connection messages to go past as Android notifications and you will also see the OpenVPN log<br />[[File:OpenVPNAndroid-A-Connecting.png|180px]] | ||
| + | # Once you get a successful connection you will see a key in the notification bar; selecting this notification will show the status of the connection ind give you some options for working with it<br />[[File:OpenVPNAndroid-B-Connected.png|180px]] | ||
| + | # You should now be able to open your favourite app used to access files on your HDA, be that the Amahi app, Plex client, OwnCloud, etc. (note that some of these apps may need to be switched between Local and Remote connection type) | ||
| + | |||
This guide is written for a HTC Android G1/Dream phone rooted with Cyanongenmod 5. | This guide is written for a HTC Android G1/Dream phone rooted with Cyanongenmod 5. | ||
| Line 8: | Line 47: | ||
[update September 9, 2011: Tested and works with MIUI 1.9.2 on a HTC Droid Incredible 2, should work on any MIUI ROM] | [update September 9, 2011: Tested and works with MIUI 1.9.2 on a HTC Droid Incredible 2, should work on any MIUI ROM] | ||
| + | |||
| + | [update 22 March 2013: Tested and works with Android 4.2.2 on Nexus Devices] | ||
In your Linux-based OS computer.. | In your Linux-based OS computer.. | ||
| − | + | Download the certificates. They can be found on the [[OpenVPN Client Certificates]] download page. Save them in your /home/username/openvpn folder (where ''username'' is your main users name). | |
| − | |||
| − | |||
| − | |||
Then, from the terminal run | Then, from the terminal run | ||
| − | + | cd /home/username/openvpn | |
| − | openssl pkcs12 -export -in | + | openssl pkcs12 -export -in Amahi-Client-OpenVPN.crt -inkey Amahi-Client-OpenVPN.key -certfile ca.crt -name Amahi -out certs.p12 |
You will be asked for a export password for the certs.p12 file - enter amahi twice. | You will be asked for a export password for the certs.p12 file - enter amahi twice. | ||
| − | To automate this process, paste the code from [ | + | To automate this process, paste the code from [http://wiki.amahi.org/images/f/f9/Automate.script automate.script] in your favorite editor. Save it & run it with |
| + | sh <filename> | ||
You should now have a certs.p12 file in your /home/username/openvpn folder, copy this certs.p12 file to the root of your sdcard on the Android phone. | You should now have a certs.p12 file in your /home/username/openvpn folder, copy this certs.p12 file to the root of your sdcard on the Android phone. | ||
| Line 114: | Line 153: | ||
* Set "Load module using" to insmod. | * Set "Load module using" to insmod. | ||
* Set "Path to tun module" to /system/lib/modules/tun.ko | * Set "Path to tun module" to /system/lib/modules/tun.ko | ||
| + | |||
Reboot your phone and test the configurations. It should be a one click process within the "OpenVPN Settings" app. | Reboot your phone and test the configurations. It should be a one click process within the "OpenVPN Settings" app. | ||
[[Category: VPN]] | [[Category: VPN]] | ||
Latest revision as of 14:15, 16 October 2017
| Update Needed | |
|---|---|
| The contents of this page have become outdated or irrelevant. Please consider updating it. |
OpenVPN for Android Client Configuration
This wiki has been updated for use with OpenVPN for Android v0.6.73 without Android Root access. Older versions of the wiki are maintained below.
It is presumed that you have installed the OpenVPN server app on your HDA and configured it properly.
- Download the (3) certificate files. They can be found on the OpenVPN Client Certificates download page.
- If downloading from link above directly to Android Device, Google translate may ask if you wish to translate the document, DO NOT allow any translation to occur.
- If downloading to a computer first, the key is often downloaded as xxx.key.txt. You must remove the .txt extension.
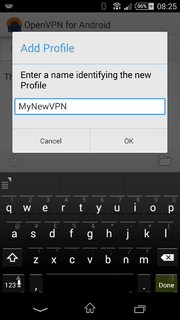
- Launch the OpenVPN app, select Add Profile (+), give it a name and it will bring you to the Basic configuration tab
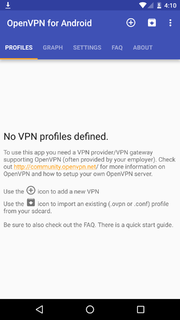
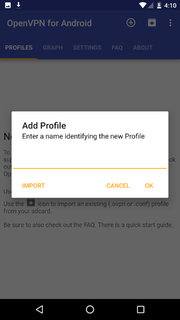
- In the Basic tab, Select "User/PW + Certificates" from the pull down menu of Types
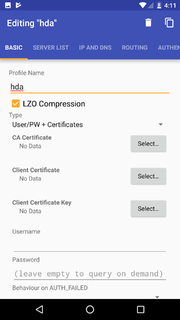
- In turn, select the CA Certificate, Client Certificate and Client Key files that you downloaded to your device
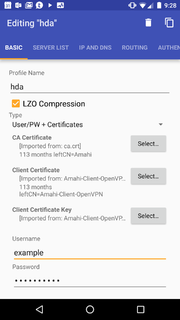
- Username refers to a configured User of the Amahi server you are trying to connect to. Leave password field empty to be prompted to enter a password every time.
- Swipe left or right to change tabs in the Configuration page or select them directly from the tab bar.
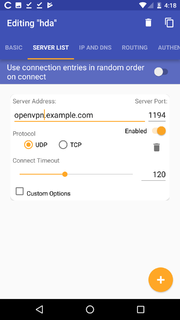
- From the Server List tab, enter your server Dynamic DNS name found on the Control Panel - xxx.yourhda.com
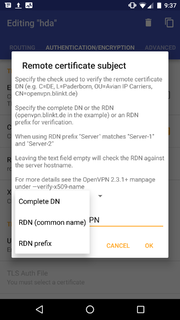
- From the Authentication/Encryption tab, select Remote Certificate Subject and look closely for the pull down arrow in the open window, select RDN Prefix
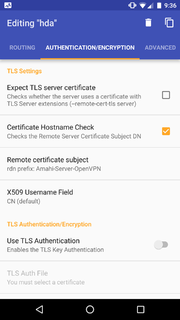
- In the Remote Certificate Subject box change the data field to read Amahi-Server-OpenVPN
- Configuration is complete, hit the android device's back button to return to the OpenVPN main screen. This will show your new profile, and if you are NOT connected to your local network (turn off Wi-Fi and use cellular data), you will be able to select your profile and it will connect. A secure connection will be shown as a key symbol next to the cellular signal strength bar.
VPN Client - Android - HTC Android G1/Dream
NOTE: OpenVPN for Android works with the certificates below for ICS 4.0 or greater without rooting your device. There is no additional configuration required to the HDA or your device (Tested on HTC One X and Samsung Tab 2 also on HTC One V). For Sony Xperia ZR (and I suspect most other Android devices) the following was necessary:
- Download the certificates. They can be found on the OpenVPN Client Certificates download page.
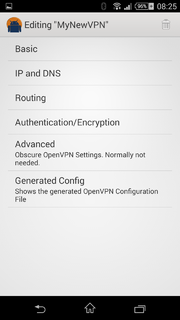
- Launch the OpenVPN app, Add Profile and go to the Basic configuration page
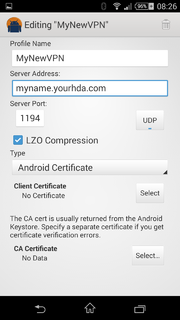
- Enter your server address - the Dynamic DNS name works for me, I guess the fixed IP address would as well
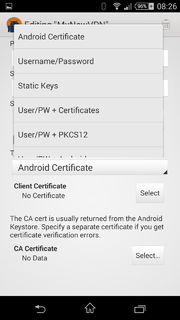
- Select "User/PW + Certificates" from the list of Types (the certificates alone are not enough)
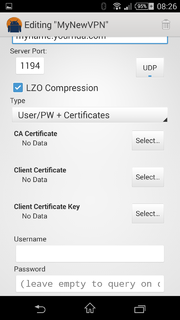
- In turn, select the CA Certificate, Client Certificate and Client Key files that you downloaded to your device; note that the app will disable the file type it doesn't think will work so beware if you rename these files

- Enter your username - a general user with access to the shares and apps on your HDA
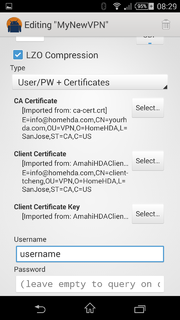
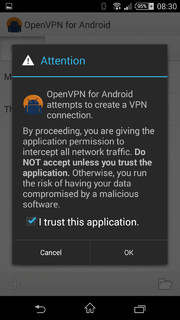
- Go back to the list of profiles and click on this new profile to start connecting to your HDA: you will be alerted to the fact that OpenVPN for Android can intercept network traffic and asked to trust the application (ensure that your device is not already connected to the same network - test from a different location or turn of wifi and use your mobile data connection)
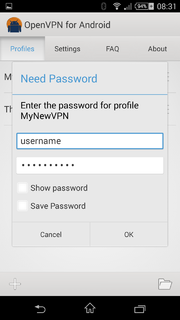
- Enter your password - you can decide whether or not the application should save the password
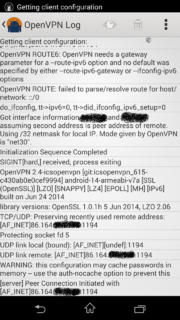
- Watch for connection messages to go past as Android notifications and you will also see the OpenVPN log
- Once you get a successful connection you will see a key in the notification bar; selecting this notification will show the status of the connection ind give you some options for working with it
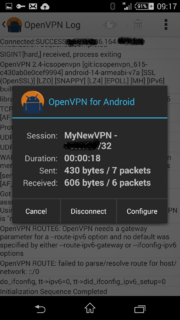
- You should now be able to open your favourite app used to access files on your HDA, be that the Amahi app, Plex client, OwnCloud, etc. (note that some of these apps may need to be switched between Local and Remote connection type)
This guide is written for a HTC Android G1/Dream phone rooted with Cyanongenmod 5.
[update March 24, 2011: Tested and works with Cyanogenmod 7.0, thus any CM7 compatible phone]
[update August 8, 2011: Tested and works with Cyanogenmod 7.1, thus any CM 7.1 compatible phone]
[update September 9, 2011: Tested and works with MIUI 1.9.2 on a HTC Droid Incredible 2, should work on any MIUI ROM]
[update 22 March 2013: Tested and works with Android 4.2.2 on Nexus Devices]
In your Linux-based OS computer..
Download the certificates. They can be found on the OpenVPN Client Certificates download page. Save them in your /home/username/openvpn folder (where username is your main users name).
Then, from the terminal run
cd /home/username/openvpn
openssl pkcs12 -export -in Amahi-Client-OpenVPN.crt -inkey Amahi-Client-OpenVPN.key -certfile ca.crt -name Amahi -out certs.p12
You will be asked for a export password for the certs.p12 file - enter amahi twice.
To automate this process, paste the code from automate.script in your favorite editor. Save it & run it with
sh <filename>
You should now have a certs.p12 file in your /home/username/openvpn folder, copy this certs.p12 file to the root of your sdcard on the Android phone.
Now on the Android phone..
Menu -> Settings -> Location & Security -> Install from SD card
This will show you certs.p12, select this and enter the password amahi, after it has extracted the certificates, you will be asked to name the certificate, enter Amahi.
Now on the Android phone
Menu -> Settings -> Wireless & networks -> VPN settings -> Add VPN -> Add OpenVPN VPN
VPN name = Amahi
Set VPN server = yourHDAnickname.yourhda.com
User authentication = Yes
Set CA certificate - Amahi
Set user certificate - Amahi
Menu -> Advanced -> LZO compression = Yes
Back
Menu -> Save
You should now see an Amahi entry, click on this to connect. It may ask you for the certificate access password. Then it may ask for your username and password that you use to loginon your HDA. You should see that you are connected, enjoy your VPN connection to your HDA server.
VPN Client - Android 2.2 - DROID X (Verizon Wireless)
Contact me in the forums if you need help setting this up. If you have a later version of Android such as Gingerbread (Android 2.3) then you can't use this tutorial for setting up openvpn. You can however use the openvpn configurations if your phone is already set up with openvpn.
Sag47 00:51, 5 April 2011 (PDT)
This tutorial is not for the feeble minded. I tried writing it as best as I could to keep it a "How to VPN" article and not a "How to root my droid" topic.
The default Droid X from Verizon does not come with openvpn installed. It's a little annoying and you have to be a little tech savvy to get it working. I am outlining instructions here for how I connected my Droid X to my Amahi HDA.
Some prerequisites:
- Your phone must be rooted.
- I am running Android 2.2 so these instructions may become outdated. I also recommend you be running Android 2.2 Froyo on your Droid X
- You should have adb installed (or running a more advanced bash terminal on Android like Better Terminal Emulator Pro app)
- Install the following apps
- OpenVPN Installer
- OpenVPN Settings
Create a directory on your SDCARD called openvpn or if in the terminal /sdcard/openvpn.
Follow the general VPNLinux instructions but place all of the configurations and certificates in the openvpn folder on your sdcard.
Install openvpn using the "OpenVPN Installer" app and select /system/bin each time the app asks for a location to place a binary.
You can run one of the following commands to grab the mount point of your system folder. (Run commands through adb or in a terminal on your Droid)
    df | grep system
    cat /proc/mounts | grep system
    cat /proc/mounts
My device is mounted on /dev/block/mmcblk1p21 so that is the device I am using in this tutorial. Download tun_alt.ko as recommended in this post. Copy it to the root of your sdcard.
Now we install the kernel module. Run the following command sequence (through adb or a terminal on your Droid).
    su
    mount -o rw,remount /dev/block/mmcblk1p21 /system
    mv /sdcard/tun_alt.ko /system/lib/modules/tun.ko
    cd /system/lib/modules
    chown root\: tun.ko
    chmod 644 tun.ko

    #now lets test it
    insmod /system/lib/modules/tun.ko
If you don't see any output and the "OpenVPN Installer" app successfully installed openvpn then you should be set up.
Double check your configuration in /sdcard/openvpn. Once you know everything is good then run the "OpenVPN Settings" app. It should automatically detect your configuration.
Enable OpenVPN. Select your config to turn on the tunnel. Then you should see a prompt in your notification status prompting for a password. My Droid X connected to the network after that.
There's one final step. If you remember you manually ran the insmod /system/lib/modules/tun.ko command but when you reboot your phone the module will no longer be loaded.
Go into the settings for the "OpenVPN Settings" app and modify the TUN module settings.
- Set "Load module using" to insmod.
- Set "Path to tun module" to /system/lib/modules/tun.ko
Reboot your phone and test the configurations. It should be a one click process within the "OpenVPN Settings" app.
