Difference between revisions of "USB Install"
From Amahi Wiki
m (Reverted edits by Acecydoxose (Talk) to last revision by Bigfoot65) |
|||
| (52 intermediate revisions by 2 users not shown) | |||
| Line 1: | Line 1: | ||
| − | ''' | + | ==Prequisites== |
| + | * USB Flash Drive (2-4GB minimum depending on the ISO) | ||
| + | * [https://getfedora.org/en/workstation/download/ Fedora Media Writer] (supports Windows/Mac/Linux OS) | ||
| + | <br /> | ||
| + | '''NOTE:''' Fedora Media Writer must be installed on the client system (no portable version available). | ||
| + | ==Create USB image== | ||
| + | '''NOTE:''' These instructions are based on a Windows client, but easily adaptable to MAC or Linux. | ||
| − | + | * Insert USB flash drive into your computer. | |
| − | + | * Run Fedora Media Writer | |
| + | :[[File:Fmw-ss1.png|600px]] | ||
| + | :A. Select '''Custom image''' | ||
| + | :B. Browse to select the ISO file you downloaded | ||
| + | :C. Choose '''Write to Disk.''' Please be patient as this may take a while. | ||
| + | :D. Once complete, exit and remove the USB flash drive from the computer. | ||
| − | + | ==Install Fedora == | |
| + | Insert the USB flash drive into your server, reboot the system, and follow applicable install instructions to complete the install. This method may not work well with UEFI firmware based hardware. See [[Install_troubleshooting|Install Troubleshooting]] for details. | ||
| − | + | :'''NOTE:''' Some BIOS have function keys that allow you to choose the boot media. Others may require changes to the BIOS. | |
| − | |||
| − | |||
| − | |||
| − | |||
| − | |||
| − | |||
| − | |||
| − | |||
| − | |||
| − | |||
| − | |||
| − | |||
| − | |||
| − | |||
| − | |||
| − | |||
| − | |||
| − | |||
| − | |||
| − | |||
| − | |||
| − | |||
| − | |||
| − | |||
| − | |||
| − | |||
| − | |||
| − | |||
| − | |||
| − | |||
| − | |||
| − | |||
| − | |||
| − | |||
| − | |||
| − | |||
Latest revision as of 16:42, 21 August 2019
Prequisites
- USB Flash Drive (2-4GB minimum depending on the ISO)
- Fedora Media Writer (supports Windows/Mac/Linux OS)
NOTE: Fedora Media Writer must be installed on the client system (no portable version available).
Create USB image
NOTE: These instructions are based on a Windows client, but easily adaptable to MAC or Linux.
- Insert USB flash drive into your computer.
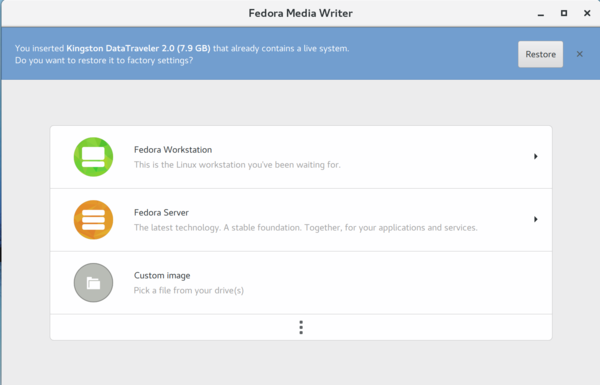
- Run Fedora Media Writer

- A. Select Custom image
- B. Browse to select the ISO file you downloaded
- C. Choose Write to Disk. Please be patient as this may take a while.
- D. Once complete, exit and remove the USB flash drive from the computer.
Install Fedora
Insert the USB flash drive into your server, reboot the system, and follow applicable install instructions to complete the install. This method may not work well with UEFI firmware based hardware. See Install Troubleshooting for details.
- NOTE: Some BIOS have function keys that allow you to choose the boot media. Others may require changes to the BIOS.
