Difference between revisions of "Backup and Recovery of ownCloud"
| Line 200: | Line 200: | ||
* Go to the Amahi Dashboard, Apps => Available, install ownCloud. | * Go to the Amahi Dashboard, Apps => Available, install ownCloud. | ||
| + | |||
| + | * Go to a "terminal" session and login to the "root" user ID. | ||
* Restore the ownCloud "config" directory from the most recent backups with the following: | * Restore the ownCloud "config" directory from the most recent backups with the following: | ||
| Line 212: | Line 214: | ||
<blockquote>{{Code|mysql -u owncloud -powncloud owncloud < /var/hda/backups/daily.0/owncloud/database_dump/owncloud_db.sql}} | <blockquote>{{Code|mysql -u owncloud -powncloud owncloud < /var/hda/backups/daily.0/owncloud/database_dump/owncloud_db.sql}} | ||
</blockquote> | </blockquote> | ||
| − | * Login to a normal user ID and test ownCloud functionality (i.e. sharing) and applications. | + | * Login to ownCloud using a normal user ID and test ownCloud functionality (i.e. sharing) and applications. |
* If the prior testing was successful have other users test their ownCloud IDs. | * If the prior testing was successful have other users test their ownCloud IDs. | ||
* The restore of ownCloud is now completed. | * The restore of ownCloud is now completed. | ||
Revision as of 16:16, 18 February 2013

|
Work In Progress |
|---|---|
| This article is currently undergoing major expansion or restructuring. You are welcome to assist by editing it as well. If this article has not been edited in several days, please remove this template. |
Have you been backing up your current ownCloud instance? If not, perhaps it's time? Think of all that time spent doing the setup and all that important data now stored in your ownCloud. Do you really want to take a chance losing the ownCloud configuration and all that stored data? Don't make it a "round to it" make it a "do it".
Following information will be provided to "backup and recover" data specific to ownCloud. No attempts will be made to discuss "philosophies" for backup and recover. The rsnapshot application will be used to backup data for an ownCloud instance and stored files. rnapshot does not perform the recovery of data and files. Recovery from the data backups will be done by other methods. Additionally, information provided is based on a Fedora platform.
Contents
| ownCloud Tip! | |
|---|---|
| Before going further please become acquainted with the "rsnapshot" Wiki article. |
Key Directories
Before getting started a discussion of the directories referred in this section need to be explained.
The key directories of concern are:
- The directories storing the ownCloud application binaries.
- The directories for the stored ownCloud data files.
- The backup directories for the ownCloud binaries, stored files, and the ownCloud database.
Please notice that the stored data files used in this discussion are for the default "Amahi shares" directories for the sake of keeping the discussion less confusing.
ownCloud Binary Directories
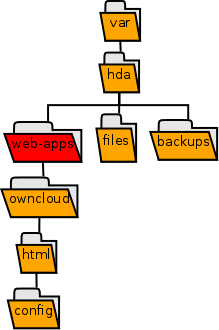
| The "web-apps" (red folder) directory structure is where application binaries for Amahi are stored. Below is the "owncloud-html branch". Under this branch is a collection of directories containing binaries for the ownCloud application. The "config" directory in particular is important as it contains files containing configuration and sharing information for an ownCloud instance. This directory is important when re-installing (recovery), updating, or upgrading (see "Upgrading ownCloud to New Version Releases") ownCloud. |
ownCloud Data Directories
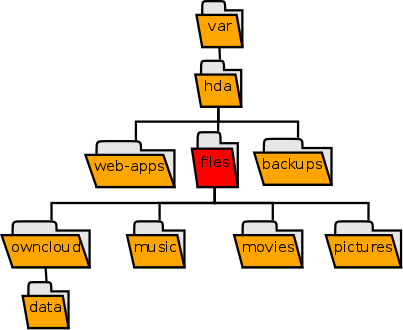
| The "files" directory (red folder) referenced here is a typical Amahi shares structure. The "owncloud-data branch" is where physical files are stored in ownCloud. It is also important to note that "meta-data" for physicial files is kept in the ownCloud database (file sharing, groups). Therefore, it is important no only to backup the physical files but also the ownCloud database. |
rsnapshot Backup Directories
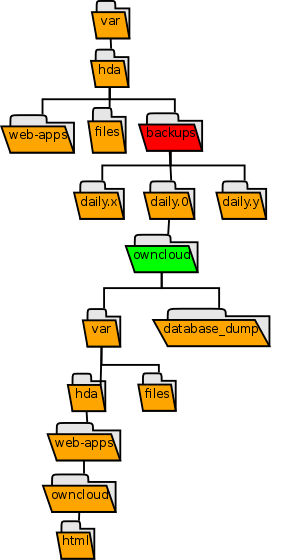
| The "backups" directory (red folder) shown here is located in the same filesystem location as the Amahi hda structures. This is not a recommended practice as the backups directory could be on the same hard disk(s) as the hda directories, it is only intended as an example for this article only. Normally the backups directory structure should be stored in a separate hard disk assembly (i.e. external drive) from the source hda structures.
Below each "daily.?" backup set a directory (green folder) is created, normally intended for identifying a server name (default is localhost), for the purpose of this example "owncloud" is treated as the "server". Under the "owncloud server directory" structure there are branches containing backups of the ownCloud binaries, physical files, and "database dump". The "database_dump" directory contains a backup of the ownCloud database. rsnapshot can be configured to add additional branches under the owncloud server directory to store other backup data. |
Configure
This section shows how to configure rsnapshot for backing up ownCloud binaries, physical files, and the ownCloud database information based on the previous key directories discussion. Minimal information for each configuration setting will be provided. For details refer to the Amahi rsnapshot wiki article or the rnapshot web site.
Follow the following configuration steps:
- Make sure that rsnapshot is installed. Fedora and Ubuntu distributions have packages available for the software.
- Open a "terminal" session and login to the "root" user ID.
- Move to the "/var/hda" directory.
- Create the "backups" directory and set permissions/ownership.
bash code cd /var/hda mkdir backups chmod 755 backups chown root:root backups
- Move to the "/etc" directory.
bash code cd /etc
- Make a backup copy of the rsnapshot configuration file. Why? So that there is a reference just in case.
bash code cp rsnapshot.conf rsnapshot.conf.bkup
- Now using a favourite editor, open the "rnapshot.conf" file.
Please Note: Items in the configuration files are separated by "tab" characters and NOT multiple spaces.
- Find the "SNAPSHOT ROOT DIRECTORY" section and change "snapshot_root" to path where the backups will be stored.
Text snapshot_root /var/hda/backups/
- Find the "BACKUP INTERVALS" section and change the line items. What does this all mean? The "#" character at the beginning of each line means the configuration line item will not be enabled. The "#" is know to set a line to be a "comment" line. The "interval daily" line will be active and 7 days of backups will be kept.
Text #interval hourly 6 interval daily 7 #interval weekly 4 #interval monthly 1
- Find the "logfile" line and change the line item. The rsnapshot log file will be kept under the "backups" directory.
Text logfile /var/hda/backups/logs/rsnapshot
- Find the "BACKUP POINTS / SCRIPTS" section. Add changes as seen below. This is the section that defines the "key directories" source that will be backed up. See the "owncloud/" at the end of each line? Remember the previous "green" server folder? This is where the ownCloud binaries and physical files will be stored.
Text backup /var/hda/files/ owncloud/ backup /var/hda/web-apps/owncloud/ owncloud/
- Next find the line "" change as shown below. This set the location where the ownCloud "database dump" backup will be kept. Also the line shows the execution path for the database backup program script file that performs the database backup.
Text backup_script /usr/local/bin/backup_mysql.sh owncloud/database_dump
- Save the "rsnapshot.conf" file and return to the command-line prompt.
- Next database backup program script file has to be set up.
- Copy database backup script to the "/usr/local/bin/".
bash code cp /usr/share/doc/rsnapshot/examples/utils/backup_mysql.sh /usr/local/bin/
- Go to the "/usr/local/bin/" directory and set the script file permissions and ownership.
bash code cd /usr/local/bin/ chown root:root /usr/local/bin/backup_mysql.sh chmod 754 /usr/local/bin/backup_mysql.sh
- Edit the "backup_mysql.sh" file.
- Find the line "backup the database" and add the line has shown below. This will be the command that will be issued to do the database backup. The database dump file will be called "owncloud_db.sql".
Text /usr/bin/mysqldump -uowncloud -powncloud owncloud > owncloud_db.sql
- Find the line "# make the backup readable only by root" and add the line shown below.
Text /bin/chmod 600 owncloud_db.sql
- Save the "backup_mysql.sh" file and return to the command-line prompt.
- There rsnapshot is configured to backup ownCloud.
Test
- Now the changes to the rsnapshot configuration file have to be tested. rnsapshot has a feature to test changes to make sure things have been setup correctly.
- Enter the following on the command-line to initiate the test.
bash code rsnapshot configtest
- When the test completes the following should be displayed:
Text Syntax OK
- If an error occurs the rsnapshot configuration file will need to be checked.
Backup
- The following command-line entry will perform the backup:
bash code rsnapshot daily
- The first time that rsnapshot runs could take sometime, each subsequent run should be quicker (depending on data changes).
- The following directories are created over time under the "backups" directory:
Text drwxr-xr-x 3 root root 4096 Feb 15 01:30 daily.0 drwxr-xr-x 3 root root 4096 Feb 14 01:30 daily.1 drwxr-xr-x 3 root root 4096 Feb 13 01:30 daily.2 drwxr-xr-x 3 root root 4096 Feb 12 01:30 daily.3 drwxr-xr-x 3 root root 4096 Feb 11 01:30 daily.4 drwxr-xr-x 3 root root 4096 Feb 10 01:30 daily.5 drwxr-xr-x 3 root root 4096 Feb 9 01:30 daily.6 drwxr-xr-x 2 root root 4096 Jan 20 09:38 logs
- As mentioned before, notice that the "daily.0" directory is the most recent backup version.
Recovery
This section will discuss restoring, updating, and upgrading parts of ownCloud from backups. ownCloud recovery from backups use the "rsync" command.
Restore ownCloud
The following steps will restore the ownCloud binaries and configuration.
- Go to the Amahi Dashboard, Apps => Installed make sure that ownCloud is uninstalled.
- If ownCloud is still installed, uninstall the current ownCloud instance. This will remove the ownCloud binaries and ownCloud database.
- Go to the Amahi Dashboard, Apps => Available, install ownCloud.
- Go to a "terminal" session and login to the "root" user ID.
- Restore the ownCloud "config" directory from the most recent backups with the following:
bash code rsync -avr --delete /var/hda/backups/daily.0/owncloud/var/hda/web-apps/owncloud/html/config /var/hda/web-apps/owncloud/html/
- Restore the ownCloud "apps" directory from the most recent backups with the following:
bash code rsync -avr --delete /var/hda/backups/daily.0/owncloud/var/hda/web-apps/owncloud/html/apps /var/hda/web-apps/owncloud/html/
- Restore the ownCloud database from the most recent backups using the database dump file:
bash code mysql -u owncloud -powncloud owncloud < /var/hda/backups/daily.0/owncloud/database_dump/owncloud_db.sql
- Login to ownCloud using a normal user ID and test ownCloud functionality (i.e. sharing) and applications.
- If the prior testing was successful have other users test their ownCloud IDs.
- The restore of ownCloud is now completed.
Restore ownCloud Files
Update
- Restore the ownCloud "config" directory with the following:
bash code rsync -avr --delete /var/hda/backups/daily.0/owncloud/var/hda/web-apps/owncloud/html/config /var/hda/web-apps/owncloud/html/
- Restore the ownCloud "apps" directory with the following:
bash code rsync -avr --delete /var/hda/backups/daily.0/owncloud/var/hda/web-apps/owncloud/html/apps /var/hda/web-apps/owncloud/html/
- The following command-line entry will restore the ownCloud database:
bash code mysql -u owncloud -powncloud owncloud < /var/hda/backups/daily.0/owncloud/database_dump/owncloud_db.sql
Upgrade
- Restore the ownCloud "config" directory with the following:
bash code rsync -avr --delete /var/hda/backups/daily.0/owncloud/var/hda/web-apps/owncloud/html/config /var/hda/web-apps/owncloud/html/
- The following command-line entry will restore the ownCloud database:
bash code mysql -u owncloud -powncloud owncloud < /var/hda/backups/daily.0/owncloud/database_dump/owncloud_db.sql
Automate
<more information coming soon>


