Difference between revisions of "VPNMacTunnelBlick"
From Amahi Wiki
| Line 19: | Line 19: | ||
* Replace YourNicknameHere in the first line, for your nickname | * Replace YourNicknameHere in the first line, for your nickname | ||
* Start the VPN! | * Start the VPN! | ||
| + | |||
| + | == Semi-automatic Method for the Tunnelblick Beta == | ||
| + | If the above Amahi VPN Client Configuration package fails to install, you should try the steps below. | ||
| + | |||
| + | * We have a script to help in the installation: | ||
| + | curl -so install-amahi-vpn <nowiki>http://dl.amahi.org/vpn/tunnelblick-beta.sh</nowiki> | ||
| + | chmod 755 install-amahi-vpn | ||
| + | ./install-amahi-vpn | ||
| + | * The above should open a text editor with the conf file | ||
| + | * Replace YourNicknameHere in the first line, for your nickname | ||
| + | * Start the VPN! | ||
| + | |||
== Manual Method == | == Manual Method == | ||
Revision as of 02:06, 25 July 2010
Contents
Mac VPN Client - Tunnelblick
Tunnelblick is an open source client for Mac OS X.
NOTE: Tunnelblick may not work if you have the Cisco VPN client installed at the same time!
- Download and install the latest version of Tunnelblick for Mac OS X
- Download and install the Amahi VPN Client Configuration package
- Start the VPN!
Semi-automatic Method
If the above Amahi VPN Client Configuration package fails to install, you should try the steps below.
- We have a script to help in the installation:
       curl -so install-amahi-vpn http://dl.amahi.org/vpn/mac.sh
       chmod 755 install-amahi-vpn
       ./install-amahi-vpn
- The above should open a text editor with the conf file
- Replace YourNicknameHere in the first line, for your nickname
- Start the VPN!
Semi-automatic Method for the Tunnelblick Beta
If the above Amahi VPN Client Configuration package fails to install, you should try the steps below.
- We have a script to help in the installation:
       curl -so install-amahi-vpn http://dl.amahi.org/vpn/tunnelblick-beta.sh
       chmod 755 install-amahi-vpn
       ./install-amahi-vpn
- The above should open a text editor with the conf file
- Replace YourNicknameHere in the first line, for your nickname
- Start the VPN!
Manual Method
- Detailed instructions
- There are three .ctr/.key files needed (make sure you follow the links to these in this wiki properly) Right click and save as to save these to your computer:
- Download the .ctr/.key files and save them in the /Users/username/Library/Application Support/Tunnelblick/Configurations/ folder, where username is the home directory of the current user.
- Go to the configuration for Tunnelblick and edit the config file.
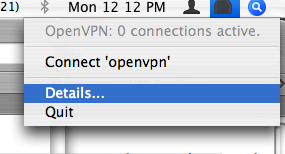
- Click on the Tunnelblick icon in the upper right corner of the display, then click Details...
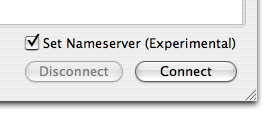
- "OpenVPN Log Output" window should appear, click on Edit Configuration. Make sure the Set Nameserver (Experimental) option is checked.
- Delete the default sample configuration
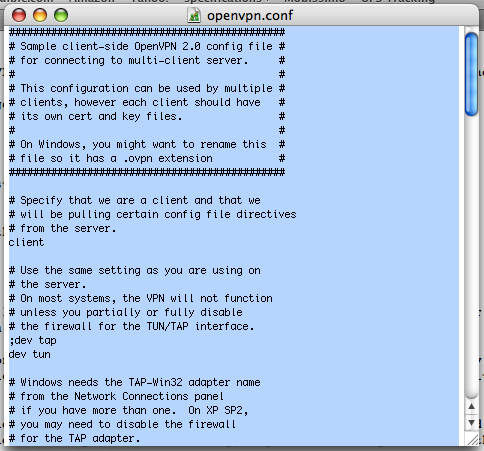
- Copy and paste the configuration below into the OpenVPN.conf file, replacing XYZ for your HDA's nickname:


      remote XYZ.yourhda.com 1194
      client
      dev tun
      proto udp
      resolv-retry infinite
      nobind
      persist-key
      persist-tun
      ca Ca-cert.crt
      cert AmahiHDAClient.crt
      key AmahiHDAClient.key
      comp-lzo
      verb 3
      auth-user-pass
- Any time you want to connect from outside of your home network and into your home network, simply click on Connect
- Don't forget to click on the DNS option.
- Input your username and password
- It is possible to use keyrings. Will link here the details when available.
Note:
- The procedure above has been tested with an Intel-based Mac.
Acessing Shares:
- Once connected, in Finder, go to "Go" > "Connect to Server". You'll be prompted to type in your HDA address (smb://hda)
- There have been cases in which the hda name did not work due to DNS issues. If this is the case, you can connect via ip address of your HDA (smb://192.168.X.X)